
Table of Contents
Growing your own collection of houseplants can feel like magic, especially when you know that some propagation methods can boost your plant success rate by over 70 percent compared to others. Most people think plant propagation is tricky or unpredictable, and that only experts can master it. The real surprise is that with the right method and a few careful steps, anyone can turn a single plant into an entire garden–all it takes is the right know-how and a bit of patience.
Quick Summary
| Key Point | Explanation |
|---|---|
| 1. Choose appropriate propagation methods | Select a method that suits the plant type and your gardening goals for optimal success. |
| 2. Prepare essential tools and materials | Having clean, sharp tools and suitable rooting mediums enhances the odds of successful propagation. |
| 3. Maintain ideal environmental conditions | Control temperature, humidity, and light to foster rooting and reduce stress on new cuttings. |
| 4. Verify root development before transplanting | Check root health by examining cuttings gently; successful roots should be firm and white. |
| 5. Transplant with care to minimize shock | Acclimate plants gradually and ensure proper planting depth to help them thrive in their new environment. |
Step 1: Choose the Right Propagation Method
Successful plant propagation begins with selecting the most appropriate method for your specific plant and gardening goals. Understanding different propagation techniques allows you to multiply your plant collection efficiently and strategically. Not all plants propagate the same way, which means you will need to match your technique to each plant’s unique characteristics and growth patterns.
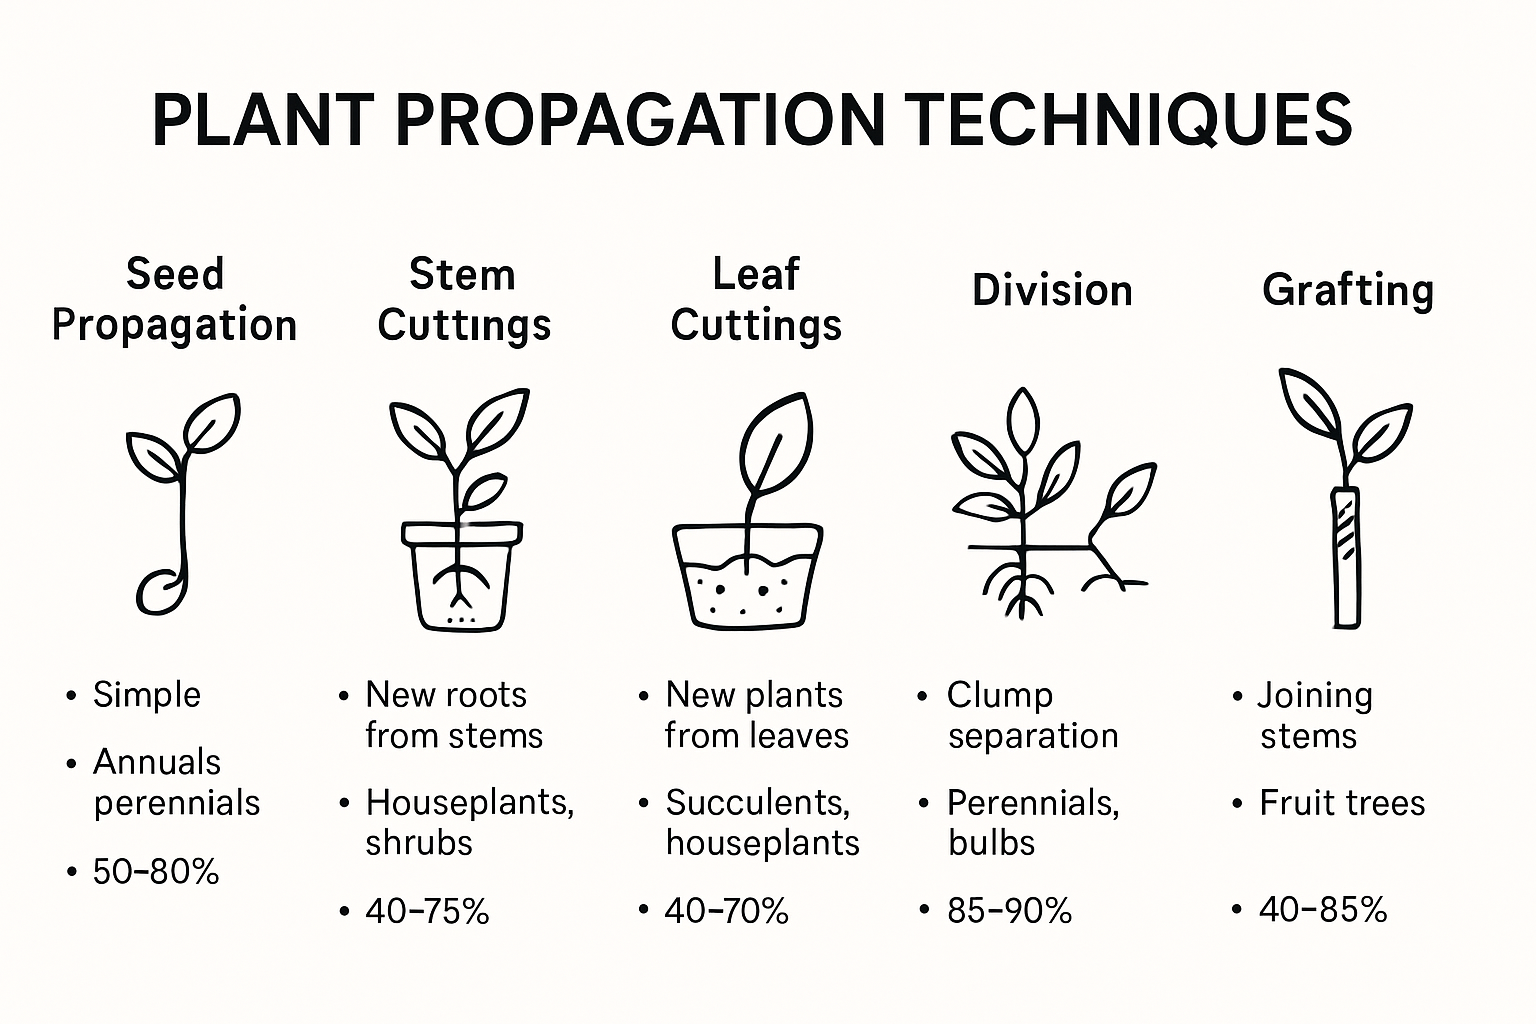
The primary plant propagation techniques include sexual reproduction through seeds and asexual reproduction through methods like cuttings, division, layering, and grafting. Each method offers distinct advantages depending on the plant species, your available resources, and desired outcomes. For instance, some plants root easily from stem cuttings, while others require more complex techniques like grafting or specialized division processes.
Below is a quick-reference table outlining the primary plant propagation methods, their typical uses, and examples of suitable plant types. This can help you match the best method to your plant and gardening needs.
| Propagation Method | Description | Typical Uses | Examples of Suitable Plants |
|---|---|---|---|
| Seed | Growing new plants from seeds | Sexual reproduction | Annual flowers, vegetables |
| Stem Cuttings | Using stem sections to form new plants | Common for many houseplants | Pothos, coleus, snake plant |
| Leaf Cuttings | Using leaves to generate new plants | Succulents, some houseplants | African violet, jade plant |
| Division | Splitting mature plants into sections | Clumping plants, quick results | Ferns, hostas, snake plant |
| Layering | Rooting stems while attached to parent | Woody shrubs, vining plants | Philodendron, rubber plant |
| Grafting | Joining stems or buds to rootstock | Trees, some fruiting plants | Avocado, roses, citrus |
When determining your propagation approach, consider several key factors. First, examine the plant’s natural growth habit and structural characteristics. Woody plants like shrubs and trees often respond well to grafting or hardwood cuttings, while herbaceous plants might thrive through softwood or leaf cuttings. Your environment and available resources also play crucial roles. Home gardeners with limited space might prefer compact methods like leaf propagation, whereas those with larger gardens could explore more expansive techniques.
Practical considerations are equally important. Assess your available tools, time commitment, and technical skill level. Some propagation methods require specialized equipment like rooting hormones, humidity domes, or precise temperature controls. Beginners might want to start with simpler techniques like division or stem cuttings, which typically have higher success rates and require minimal specialized knowledge.
For gardeners seeking more detailed guidance on specific plant propagation techniques, explore our comprehensive plant propagation guide that breaks down methods for various plant types. The key is patience, observation, and willingness to experiment. Not every attempt will succeed, but each propagation attempt provides valuable learning experience that improves your skills over time.
Step 2: Prepare Necessary Tools and Materials
Preparing the right tools and materials is a critical foundation for successful plant propagation. This step transforms your gardening aspiration from a theoretical concept into a practical project. Gathering the correct equipment ensures you have everything needed to support your plants through their delicate initial growth stages.
Your basic propagation toolkit should include several essential items. Sharp, clean cutting tools are paramount for creating precise plant cuttings without introducing potential infections. Invest in high quality pruning shears, a sharp grafting knife, or precision scissors specifically dedicated to plant propagation. Sterilize these tools thoroughly with rubbing alcohol before and between uses to prevent potential disease transmission between plants.
Rooting mediums play a crucial role in successful propagation. Select a lightweight, well draining substrate that provides excellent air circulation and moisture retention. Many gardeners prefer using a mix of perlite, vermiculite, and peat moss, which creates an ideal environment for root development. Specialized rooting hormones can significantly improve your success rates, particularly for more challenging plant species. These powders or gels stimulate root growth and provide essential nutrients during the critical initial propagation phase.
Additional materials will make your propagation process smoother. Clear plastic containers or humidity domes help maintain consistent moisture levels and create a microclimate conducive to root formation. Clean plant pots with drainage holes, labeled plant markers, a spray bottle for gentle watering, and a clean work surface are also invaluable. Consider setting up a dedicated propagation area with consistent temperature and indirect light to maximize your chances of success.

Use this tools and materials checklist to ensure you have everything needed for successful plant propagation. Each item is listed along with its purpose and any helpful notes for preparation or use.
| Tool/Material | Purpose | Notes |
|---|---|---|
| Pruning Shears/Scissors | Making clean, precise cuts | Sterilize with rubbing alcohol before use |
| Grafting Knife | Used for grafting or finer cuts | Keep blade sharp and disinfected |
| Rooting Medium | Supports root growth and moisture control | Perlite, vermiculite, peat moss mix ideal |
| Rooting Hormone | Stimulates root development | Especially helpful for woody cuttings |
| Plastic Containers/Domes | Maintains high humidity | Use clear covers for light and ventilation |
| Plant Pots with Drainage | For transplanting rooted cuttings | Ensure pots are clean and sized appropriately |
| Plant Markers | Labeling different plants | Use waterproof labels |
| Spray Bottle | Gentle watering of cuttings | Prevents overwatering or root disturbance |
For gardeners looking to dive deeper into specialized propagation techniques, discover advanced propagation strategies that can help you become a more confident plant enthusiast. Remember that careful preparation and attention to detail dramatically increase your likelihood of successfully creating new plants from existing ones.
Step 3: Execute the Propagation Process
The execution of plant propagation transforms your preparatory work into living, growing plants. This critical stage requires precision, patience, and a gentle touch. Successful propagation hinges on creating ideal conditions that encourage root development and minimize plant stress during the vulnerable initial growth period.
Begin by carefully taking your cuttings or preparing your chosen propagation method. When working with stem cuttings, select healthy sections approximately 4-6 inches long, making clean cuts just below a leaf node using sterilized tools. Remove lower leaves to reduce moisture loss, leaving only a few healthy leaves at the top. Dip the cut end into rooting hormone, which stimulates root development and provides essential nutrients for new growth. Gently insert the cutting into your prepared rooting medium, ensuring the node is below the surface where roots will emerge.
Maintaining optimal environmental conditions is crucial during propagation. Create a humid microclimate by covering your cuttings with a clear plastic dome or placing them in a protected area with consistent temperature and indirect light. Moisture management is key – the rooting medium should remain consistently damp but not waterlogged. Use a fine mist spray bottle to provide gentle hydration, avoiding heavy watering that could displace delicate new roots or introduce fungal diseases.
Temperature and light play significant roles in successful propagation. Most plant cuttings prefer warm environments between 70-80 degrees Fahrenheit with bright, indirect sunlight. Avoid direct sunlight, which can dry out tender cuttings before roots develop. Monitor your propagation area carefully, checking moisture levels and root development every few days. Some plants root quickly within weeks, while others may take several months to establish a robust root system.
For gardeners seeking more nuanced techniques, explore our comprehensive guide to advanced propagation methods that can help you master this transformative gardening skill. Remember that patience and consistent care are your greatest tools in successfully multiplying your plant collection.
Step 4: Monitor Environmental Conditions
Environmental monitoring represents the critical bridge between initial propagation and long-term plant survival. Precise environmental control determines whether your carefully prepared cuttings will successfully develop into robust, healthy plants. This stage requires consistent observation and subtle adjustments to create an optimal growth environment.
Temperature serves as a foundational factor in successful plant propagation. Most plant cuttings thrive in consistent temperatures between 65-75 degrees Fahrenheit, with minimal fluctuation. Use a digital thermometer to track ambient temperature and position your propagation area away from drafty windows or heating vents that could cause sudden temperature shifts. Some gardeners utilize heat mats specifically designed for propagation, which provide gentle bottom warmth that encourages root development without risking plant stress.
Humidity management is equally crucial during the propagation process. Young cuttings require high humidity levels around 70-80% to prevent moisture loss and support root formation. Clear plastic humidity domes or makeshift covers created from clear plastic bags can help maintain these critical moisture levels. Observe the interior of your humidity cover regularly – condensation indicates appropriate moisture, while excessive water droplets suggest the need for slight ventilation to prevent potential fungal growth.
Light exposure requires careful calibration during propagation. Indirect, bright light provides the ideal conditions for most plant cuttings, supporting photosynthesis without risking leaf burn or excessive moisture loss. Position your propagation setup near east or north-facing windows, or use grow lights set at a moderate intensity. Watch for signs of light stress such as leaf discoloration or wilting, which indicate the need for light intensity adjustment.
For gardeners seeking more advanced techniques, discover expert strategies for environmental control that can elevate your plant propagation skills. Remember that each plant species has unique environmental preferences, so patience and careful observation are your most valuable tools in creating a successful propagation environment.
Step 5: Verify Root Development and Health
Verifying root development represents the most exciting stage of plant propagation, where your careful efforts transform from potential to tangible growth. Successful root formation signals the transition from fragile cutting to an independent young plant ready for its next growth phase. Patience and keen observation are your primary tools during this critical verification process.
Gentle investigation allows you to assess root development without causing undue stress to your new plant. After several weeks, carefully lift a single cutting to examine its root system. Healthy roots appear white or light tan, firm to the touch, and demonstrate a branching structure with multiple root points. Avoid pulling forcefully – instead, tilt the container and allow the rooting medium to slide away slowly, revealing the delicate root network. Roots measuring approximately 1-2 inches in length typically indicate successful propagation and readiness for transplanting.
Visual and tactile indicators provide crucial insights into root and overall plant health. Look for signs of vigorous growth, such as new leaf development, maintained leaf color, and firm stem structure. Yellowing leaves, mushy stem bases, or root discoloration suggest potential issues like overwatering, fungal infections, or inadequate environmental conditions. Some cuttings might require additional time in their initial rooting environment, so resist the urge to transplant prematurely.
Different propagation methods demand unique verification approaches. Stem cuttings might show root development through gentle tugging resistance, while leaf cuttings could develop small plantlets at their base. Water propagation allows direct root observation, making it an excellent method for visual tracking. Regardless of technique, maintaining consistent environmental conditions remains crucial during this verification stage.
For gardeners seeking deeper insights into successful plant propagation, explore our comprehensive guide to understanding plant growth stages. Remember that each plant species has unique root development timelines, and what works for one might require adjustment for another. Patience, careful observation, and a willingness to learn from each propagation attempt will ultimately transform you into a confident plant propagation expert.
Step 6: Transplant New Plants with Care
Transplanting represents the culmination of your propagation journey, transforming delicate cuttings into established garden residents. Successful transplantation requires precision and gentleness, treating your young plants like fragile newcomers entering their permanent home. This critical stage determines whether your carefully nurtured plants will thrive or struggle in their new environment.
Prepare the transplant site meticulously before moving your propagated plants. Select a location matching the plant’s specific light, soil, and moisture requirements. Dig a hole approximately twice the width of the root system, ensuring loose, well-draining soil that allows roots to spread easily. Incorporate organic compost to provide initial nutrients and improve soil structure. The depth should match the plant’s original rooting medium, avoiding burial of stems or leaves that could risk rot or disease.
When removing plants from their initial propagation containers, exercise extreme care to minimize root disturbance. Water the rooting medium thoroughly before transplanting to ensure roots remain intact and surrounded by their familiar growing medium. Hold the plant gently by its base, allowing the root system to slide out naturally. If roots appear tightly wound, use your fingers to carefully loosen them, encouraging outward growth in their new location. Immediate post-transplant care is crucial – water thoroughly but avoid saturating the soil, creating a balanced moisture environment that supports establishment.
Environmental shock represents the greatest risk during transplantation. Gradually acclimate your young plants by introducing them to their new conditions incrementally. If moving from indoor to outdoor environments, implement a hardening process over 7-10 days, exposing plants to progressively longer outdoor periods. Monitor new transplants closely for signs of stress such as wilting, discoloration, or leaf drop. Some initial adjustment is normal, but significant deterioration might indicate a need for intervention.
Learn advanced techniques for nurturing newly transplanted plants to maximize your propagation success. Remember that patience and attentive care transform your propagated cuttings from vulnerable beginners to robust, thriving garden residents.
Unlock Your Garden’s Potential with Expert Propagation Guidance
Have you worked hard to follow every propagation step, only to still wonder why some cuttings fail to thrive or why root development seems unpredictable? There is nothing more discouraging than watching your carefully chosen plants struggle to adapt, even after preparing the right tools, maintaining humidity, and following detailed instructions. This article has taken you through selecting the best technique, gathering essential materials, and monitoring every stage—yet real success means overcoming doubts and building confidence with trusted advice and reliable resources.
Take your next step to reliable, thriving gardens by exploring more personal tips and expert strategies at Lushy Gardens. Dive deeper into practical plant propagation by visiting our comprehensive featured article on snake plant propagation. If you crave answers to unique plant challenges, discover our growing archives designed for curious plant lovers. Start your journey, connect with a like-minded community, and transform every cutting into a flourishing new plant. Visit Lushy Gardens now and turn your gardening goals into reality.
Frequently Asked Questions
What are the different methods of plant propagation?
The primary methods of plant propagation include sexual reproduction through seeds and asexual reproduction methods such as cuttings, division, layering, and grafting. Each technique has unique advantages and is suited for different plant species.
How do I prepare tools and materials for plant propagation?
To prepare for plant propagation, gather essential tools like sharp, clean pruning shears or precision scissors, and sterlize them prior to use. Additionally, select a lightweight, well-draining rooting medium, consider using rooting hormones, and create a humidity-controlled environment with clear plastic containers or humidity domes.
What conditions do I need to maintain while propagating plants?
During plant propagation, maintain a consistent temperature between 70-80 degrees Fahrenheit, provide bright indirect light, and ensure high humidity levels around 70-80%. Regularly check moisture levels to keep the rooting medium damp but not soggy, and watch for signs of stress in your cuttings.
How can I determine if my plant cuttings have developed sufficient roots for transplanting?
To verify root development, gently lift a cutting after a few weeks to check the root system. Healthy roots will appear white or light tan and should be around 1-2 inches long. Look for signs of new growth, like new leaves or firm stems, which suggest the cutting is ready for transplanting.
Recommended
- How to Propagate Snake Plant: Step-By-Step Guide for Thriving Plants – Lushy Gardens
- How to Propagate Rubber Plant – A Complete Step-By-Step Guide – Lushy Gardens
- How to Propagate Jade Plant – A Comprehensive Guide – Lushy Gardens
- How to Propagate ZZ Plant – A Simple Guide for Home Gardeners – Lushy Gardens

I’m Eleanor, a seasoned gardener with over three decades of experience tending to Mother Nature’s creations. Through Lushy Gardens, I aim to share my wealth of knowledge and help fellow plant enthusiasts uncover the wonders of gardening. Let’s dive into this journey together, one leaf at a time.


