
Table of Contents
Lavender might seem like just another pretty flower for your garden, but this fragrant powerhouse does a whole lot more than you might expect. Most people do not realize that lavender plants can thrive for up to 15 years with the right care and variety choice. Think growing lush, aromatic lavender is complicated or meant only for experts? With a few key steps and clever tricks, anyone can transform an ordinary garden into a vibrant, lavender-filled haven that feels effortless.
Quick Summary
| Key Point | Explanation |
|---|---|
| 1. Choose the right lavender variety | Select based on your local climate and garden conditions for optimal growth. |
| 2. Ensure excellent soil drainage | Modify soil by adding sand or gravel to prevent water retention and promote healthy roots. |
| 3. Water deeply but infrequently | Water when the top two inches of soil are dry to mimic lavender’s native environment. |
| 4. Prune annually for better blooms | Regularly prune to maintain shape and encourage healthy growth while preventing woodiness. |
| 5. Harvest flowers at the right time | Cut when the first flowers begin to open to enhance fragrance and longevity of the blooms. |
Step 1: Choose the Right Lavender Variety for Your Space
Selecting the perfect lavender variety is crucial for successful garden cultivation. Different lavender types thrive in specific environments, making your initial choice fundamental to long term plant health and garden aesthetics. Understanding the characteristics of each variety will help you make an informed decision that matches your local climate, garden space, and personal preferences.
Lavender comes in three primary varieties: English lavender (Lavandula angustifolia), Spanish lavender (Lavandula stoechas), and Lavandin (Lavandula x intermedia). English lavender is the most popular and versatile, featuring compact growth and exceptional cold hardiness. This variety typically grows 12 to 18 inches tall, producing dense clusters of fragrant purple flowers ideal for smaller gardens and container plantings. Renowned cultivars like ‘Hidcote’ and ‘Munstead’ are particularly well suited for gardeners seeking reliable performance.
When selecting your lavender, consider critical environmental factors including your local climate zone, sunlight availability, and soil conditions. Warmer regions might benefit from Spanish lavender’s heat tolerance, while cooler climates demand the robust characteristics of English lavender varieties. Our guide on companion planting can provide additional insights into creating harmonious garden ecosystems around your chosen lavender plants.
According to the University of California Agriculture and Natural Resources, successful lavender cultivation depends on matching the right variety to your specific growing conditions. Gardeners should evaluate their local temperature ranges, precipitation levels, and soil drainage to ensure optimal plant health. By carefully selecting a lavender variety that naturally aligns with your garden’s unique characteristics, you dramatically increase your chances of growing vibrant, aromatic plants that will transform your outdoor space.
Below is a comparison table of common lavender varieties mentioned in the guide to help you select the best type for your garden.
| Lavender Variety | Climate Suitability | Key Features | Typical Height |
|---|---|---|---|
| English Lavender | Cooler climates, hardy zones | Compact, dense purple blooms, versatile | 12-18 inches |
| Spanish Lavender | Warmer, Mediterranean zones | Heat tolerant, showy bracts | 18-24 inches |
| Lavandin | Varied, but not as cold-hardy | Robust growth, strong fragrance | 18-24 inches |
Step 2: Prepare Your Soil and Planting Area Effectively
Successful lavender cultivation begins with creating the ideal growing environment. Soil preparation is more than just digging a hole and planting your lavender – it requires strategic planning and understanding of your garden’s unique conditions. Drainage and soil composition are critical factors that will determine your lavender’s long term health and vitality.
Start by selecting a location with full sun exposure and excellent drainage. Lavender despises wet feet and will quickly deteriorate in soggy soil conditions. If your garden has heavy clay soil, you will need to modify the planting area to create a more hospitable environment. This typically involves incorporating coarse sand, fine gravel, or specialized soil amendments that improve drainage and prevent water retention. According to the University of Maine Extension, lavender thrives best in sandy loam or gravelly soils with a slightly alkaline pH range between 6.5 and 8.0.
Before planting, conduct a soil test to understand your current soil composition and pH levels. Most garden centers offer affordable soil testing kits that provide comprehensive insights. If your soil is too acidic, you can gradually raise the pH by adding agricultural lime. When preparing the planting area, dig and loosen the soil to a depth of 12 to 18 inches, breaking up any compacted layers and ensuring roots can easily spread. Mix in organic matter like compost to improve soil structure, but avoid using rich, nitrogen heavy amendments that can cause excessive leaf growth at the expense of flower production. Learn more about companion planting strategies to create a harmonious garden ecosystem that supports your lavender’s growth. The goal is to create a well draining, slightly lean soil environment that mimics the rocky Mediterranean landscapes where lavender naturally thrives.

Step 3: Plant Lavender Seeds or Seedlings Correctly
Planting lavender requires precision and understanding of the plant’s specific growth requirements. Whether you are starting from seeds or transplanting young seedlings, careful technique will determine your lavender’s future success. Most gardeners find purchasing established seedlings provides faster and more reliable results compared to growing from seed, which demands significant patience and specific environmental conditions.
If starting from seeds, begin indoors approximately 6 to 8 weeks before the last expected frost in your region. Use a specialized seed starting mix with excellent drainage, pressing seeds gently onto the soil surface without burying them deeply. Lavender seeds require consistent warmth around 70 degrees Fahrenheit and significant light to germinate. Germination can take up to one month, so maintaining steady moisture without waterlogging is crucial. Once seedlings develop 2 to 3 sets of true leaves, they can be carefully transplanted into individual containers or prepared garden spaces.
According to the University of California Agriculture and Natural Resources, spacing is critical when planting lavender. Young plants should be positioned approximately 2 to 3 feet apart, allowing sufficient room for future growth and air circulation. When transplanting, dig a hole slightly larger than the root ball, ensuring the plant sits at the same depth it was growing in its original container. Gently firm the soil around the roots and water thoroughly but sparingly.
Our guide on companion planting can help you strategically position your lavender within your garden ecosystem. After planting, monitor your young lavender carefully during its first growing season, providing consistent but minimal water to encourage strong root development and resilient growth.
Step 4: Water and Mulch to Support Healthy Growth
Watering and mulching are critical stages in establishing healthy lavender plants that will thrive for years. Lavender demands a delicate balance of moisture management that differs significantly from many other garden plants. Understanding these nuanced requirements will prevent common mistakes that can lead to root rot or stunted growth.
When establishing young lavender plants, water deeply but infrequently to encourage robust root development. During the first growing season, provide water when the top two inches of soil feel completely dry. This approach simulates the plant’s native Mediterranean environment, promoting resilience and preventing overwatering. Mature lavender plants are remarkably drought tolerant and actually prefer minimal irrigation. In fact, excessive moisture is more dangerous than occasional dryness. Use a drip irrigation system or water at the base of the plant to keep foliage dry, which helps prevent fungal diseases.
Mulching requires a strategic approach that differs from traditional gardening practices. Instead of organic materials like bark or leaf mulch that retain moisture, lavender benefits from light gravel or small stone mulches that reflect sunlight and improve drainage. According to University of Maine Extension, these inorganic mulches help maintain consistent soil temperatures and prevent weed growth without compromising the plant’s need for excellent drainage. Explore our companion planting guide to understand how strategic mulching can create a supportive garden ecosystem. By the end of your first growing season, healthy lavender plants will display vibrant green foliage, compact growth, and the beginnings of those signature fragrant blooms that make this plant a garden favorite.
Here is a step-by-step overview table summarizing each main stage of growing lavender, including the goal and key actions for each step.
| Step | Goal | Key Actions |
|---|---|---|
| Choose Variety | Select suitable lavender for your area | Match variety to climate and soil conditions |
| Prepare Soil | Create optimal growing environment | Ensure drainage, test and amend soil, adjust pH |
| Plant Lavender | Establish young plants for best results | Space plants correctly, plant at proper depth |
| Water & Mulch | Promote healthy, disease-resistant growth | Water carefully, use gravel mulch for drainage |
| Prune & Maintain | Sustain blooms and vibrant plant health | Prune annually, shape, avoid cutting woody stems |
| Harvest Lavender | Maximize fragrance and bloom quality | Cut at right time, use sharp shears, dry properly |
Step 5: Prune and Maintain for Optimal Health and Blooms
Pruning is the secret weapon for maintaining vibrant, long lived lavender plants that produce abundant fragrant blooms. Proper pruning techniques transform ordinary lavender into spectacular garden performers, encouraging robust growth and preventing the woody, leggy appearance that can plague neglected plants. Think of pruning as a strategic conversation with your lavender, guiding its shape and vitality through careful, intentional cuts.
Begin pruning in early spring when new green growth emerges, using clean, sharp pruning shears to prevent disease transmission. Remove any dead or winter damaged stems, cutting back to the first set of healthy green leaves. The goal is to create an open, rounded shape that allows sunlight and air circulation throughout the plant. During the main growing season, lightly trim after the first flush of flowers to encourage a potential second bloom and maintain a compact, attractive form. Avoid cutting into woody stems, as lavender has limited ability to regenerate from older wood. Learn more about reviving struggling plants if you encounter significant damage during your pruning process.
According to Purdue University, annual pruning is crucial for preventing lavender from becoming woody and misshapen. Most lavender varieties benefit from a significant annual pruning that removes up to one-third of the plant’s total growth, always ensuring you leave some green growth to support future development. Young lavender plants require gentler pruning, while established plants can withstand more aggressive shaping. By consistently maintaining your lavender through thoughtful pruning, you will encourage stronger root systems, more abundant flowering, and plants that remain healthy and vigorous for many years.
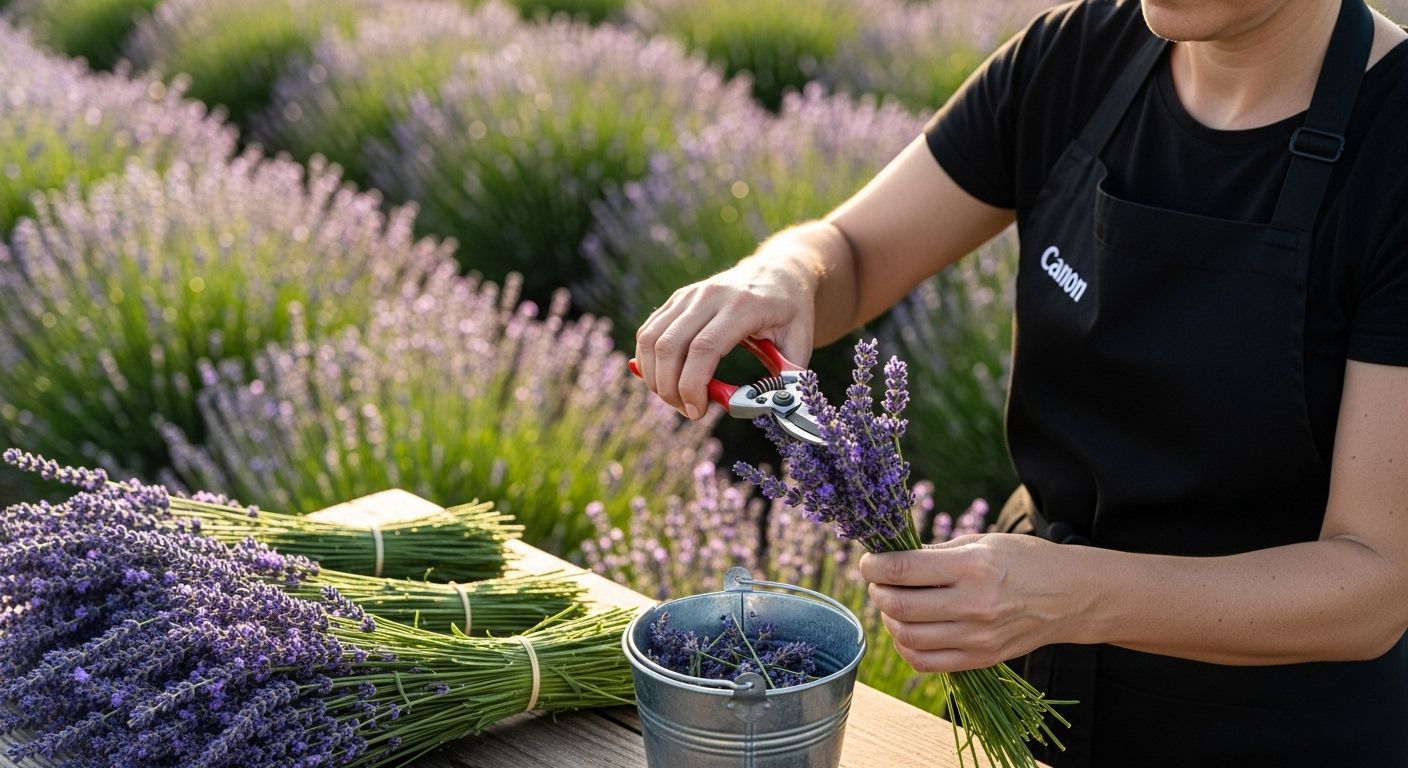
Step 6: Harvest Lavender at the Right Time for Best Results
Harvesting lavender is an art form that requires precision and understanding of the plant’s delicate flowering cycle. The moment you choose to harvest will dramatically impact the quality of your lavender’s fragrance, color, and potential uses. Whether you are collecting flowers for culinary purposes, essential oils, or dried arrangements, timing is everything in capturing lavender’s essence at its peak.
The ideal harvest window occurs when the first few flowers on each flower spike have just begun to open, typically in late morning after morning dew has evaporated. This timing ensures maximum essential oil concentration and vibrant color preservation. Use sharp, clean pruning shears to cut flower stems approximately two-thirds down from the top, leaving enough green growth to support the plant’s continued health. For dried flower arrangements, cut entire stems just as the first two flowers on the spike begin to bloom, creating uniform bundles that will dry beautifully when hung in a dark, well-ventilated space.
According to the University of California Agriculture and Natural Resources, different lavender varieties have slightly different optimal harvest times. English lavender typically flowers earlier in the season, while Spanish and Lavandin varieties bloom later. Our companion planting guide can help you understand how to integrate lavender harvest strategies within a diverse garden ecosystem. Professional lavender growers recommend harvesting before the flowers fully open to preserve the most intense aromatics. By mastering the nuanced art of lavender harvesting, you transform simple garden maintenance into a sensory experience that celebrates the plant’s remarkable versatility and beauty.
Transform Your Lavender Dreams Into Reality With Lushy Gardens
Struggling to choose the right lavender variety, prep your soil, and keep your plants healthy year after year? If the journey from seed to thriving bloom feels overwhelming, you’re not alone. Our detailed guides on drainage, pruning, and harvesting show that the path to lush, fragrant lavender is full of questions and important decisions. You deserve a trusted resource that takes your anxieties about soil conditions, watering routines, and optimal trimming times, and turns them into step-by-step confidence.
Explore the full range of practical advice and product insights by visiting our Reviews category or immerse yourself in the wider world of home gardening at Lushy Gardens. Ready to move beyond confusion and enjoy your healthiest lavender yet? Take the next step and discover how our curated collection of tips, reviews, and gardening wisdom can elevate your experience. Start your transformation today with Lushy Gardens.
Frequently Asked Questions
What is the best variety of lavender to grow in my garden?
Choosing the right lavender variety depends on your local climate and garden conditions. English lavender (Lavandula angustifolia) is popular for its versatility and cold hardiness. Spanish lavender (Lavandula stoechas) thrives in warmer regions, while Lavandin (Lavandula x intermedia) is known for its robust growth and fragrance.
How do I prepare the soil for planting lavender?
Lavender needs well-draining soil with a slightly alkaline pH (6.5 to 8.0). Modify heavy clay soil by mixing in coarse sand or fine gravel to improve drainage. Conduct a soil test to assess composition and nutrient levels before planting.
When is the best time to prune lavender plants?
Prune lavender in early spring, just as new growth appears. Remove any dead or damaged stems and shape the plant to promote air circulation. Annual pruning helps prevent woody growth and encourages abundant flowering.
How do I know when to harvest lavender?
Harvest lavender when the top flowers on each spike have just begun to open, usually in late morning after dew has evaporated. Cutting at this time ensures maximum essential oil concentration and vibrancy. For dried arrangements, cut the stems just as the first two flowers on each spike start to bloom.
Recommended
- How to Trim Lavender Plant
- What to Plant With Lavender
- How to Keep a Basil Plant Alive
- Best Time to Plant Garlic

I’m Eleanor, a seasoned gardener with over three decades of experience tending to Mother Nature’s creations. Through Lushy Gardens, I aim to share my wealth of knowledge and help fellow plant enthusiasts uncover the wonders of gardening. Let’s dive into this journey together, one leaf at a time.


