
Table of Contents
Houseplant propagation sounds complicated and maybe even a little intimidating at first. Yet, more than 70 percent of common indoor plants can be successfully propagated by the average home gardener with just a few simple tools. Most guides focus on special mixes and secret tricks, but what really makes the difference is how clean you keep your gear and how precise you are with each snip. That one overlooked detail can mean the difference between a struggling cutting and a thriving new plant.
Quick Summary
| Key Point | Explanation |
|---|---|
| 1. Gather essential propagation tools | Use sharp, sterilized tools to prevent disease and ensure healthy cuts. Key tools include pruning shears and rooting hormone. |
| 2. Choose the appropriate propagation method | Select a method based on your plant type. Options include stem cuttings, division, leaf propagation, and air layering. |
| 3. Prepare cuttings with precision | Cut 4-6 inch segments from healthy plants, ensuring to remove lower leaves and apply rooting hormone to encourage growth. |
| 4. Use a well-draining medium | Opt for a lightweight mix of perlite, peat moss, and vermiculite to promote root development while preventing waterlogging. |
| 5. Monitor care and adjust conditions | Maintain ideal temperature, humidity, and light for newly propagated plants. Watch for signs of growth or stress during the early stages. |
Step 1: Gather Essential Tools and Supplies
Successful propagating houseplants begins with strategic preparation and assembling the right equipment. Before diving into plant reproduction techniques, you need a collection of precise tools that will transform your gardening experience from hit-or-miss to consistently successful.
Your propagation toolkit should include several critical instruments that will serve as your primary companions through the plant multiplication process. According to the University of Illinois Extension, having clean, sterilized equipment is paramount to preventing disease transmission and ensuring healthy new plant growth.
Essential Tools List:
- Sharp, clean pruning shears or scissors
- Sterilized cutting implements (razor blades or precision knives)
- Rooting hormone powder or gel
- Clean propagation containers
- Well-draining potting mix
- Spray bottle for moisture control
- Clear plastic bags or humidity domes
- Rubbing alcohol for tool sterilization
Sterilization represents a critical yet often overlooked aspect of plant propagation. Before beginning any cutting or grafting process, thoroughly clean all tools using rubbing alcohol. This simple step dramatically reduces the risk of transferring potential pathogens between plants. Your cutting implements should be razor sharp to create clean, precise cuts that heal quickly and minimize plant stress.
Choosing the right rooting medium is equally important. A lightweight, well-draining mix containing ingredients like perlite, vermiculite, and peat moss provides optimal conditions for root development. Avoid standard potting soil, which can be too dense and potentially suffocate emerging roots. Instead, select a specialized propagation mix that allows adequate oxygen circulation and moisture retention.
By meticulously preparing your workspace and gathering these essential supplies, you set the foundation for successful houseplant propagation. Each tool serves a specific purpose in nurturing your plant’s journey from cutting to established new growth, transforming what might seem like a complex process into an achievable, rewarding gardening adventure.
This table outlines essential houseplant propagation tools, their specific purposes, and critical notes for successful use.
| Tool/Material | Purpose | Important Notes |
|---|---|---|
| Sharp pruning shears/scissors | Cutting stems/leaves | Should be razor sharp and sterilized |
| Rubbing alcohol | Tool sterilization | Clean before every use to prevent disease |
| Rooting hormone powder/gel | Stimulate root growth | Apply lightly to cut ends of stem/leaf |
| Clean propagation containers | Hold cuttings and rooting medium | Must be clean to avoid contamination |
| Well-draining potting mix | Root development medium | Use perlite, peat moss, and vermiculite blend |
| Spray bottle | Moisture control | Use for gentle watering/misting |
| Clear plastic bags/domes | Maintain humidity | Create a mini greenhouse effect |

Step 2: Choose the Right Propagation Method
Selecting the most appropriate propagation method transforms your houseplant multiplication efforts from potential frustration to guaranteed success. Different plant species respond uniquely to various reproduction techniques, making method selection a critical decision in your propagation journey.
According to Royal Botanic Gardens, Kew, houseplant propagation primarily involves four primary techniques: stem cuttings, division, layering, and leaf propagation. Each method offers distinct advantages depending on your specific plant type and growth characteristics.
Common Propagation Methods:
- Stem Cuttings: Best for trailing plants and those with woody stems
- Division: Ideal for plants with multiple growth points
- Leaf Propagation: Perfect for succulents and some tropical species
- Air Layering: Suitable for larger, woody houseplants
Stem cuttings represent the most versatile and beginner-friendly propagation technique. This method involves removing a healthy section of plant stem, typically 4-6 inches long, and encouraging root development through careful moisture and temperature management. Plants like pothos, philodendron, and spider plants thrive using this approach, rapidly generating new roots when placed in water or a well-draining rooting medium.
Division works exceptionally well for plants that naturally produce multiple growth points or develop cluster-like root systems. Plants such as snake plants, peace lilies, and certain ferns can be gently separated into smaller sections, with each segment containing roots and foliage. This method allows you to create multiple independent plants from a single mature specimen, making it an efficient propagation strategy.
Leaf propagation offers a fascinating alternative, particularly for succulents like jade plants and echeveria. By carefully removing a healthy leaf and allowing its base to callus before placing it on a suitable growing medium, you can generate an entirely new plant. This method requires patience but provides a remarkable way to multiply your plant collection with minimal initial investment.
Air layering represents a more advanced technique best suited for larger, woody houseplants like fiddle leaf figs or rubber trees. This method involves encouraging root growth while the stem remains attached to the parent plant, providing a higher success rate for challenging species that struggle with traditional cutting methods.
Choosing the right propagation method depends on understanding your specific plant’s growth habits, root structure, and natural reproduction tendencies. Careful observation and research will guide you toward the most effective technique for successful houseplant multiplication.
Below is a comparison of the four main houseplant propagation methods, outlining which plant types they suit best and their unique advantages.
| Propagation Method | Best For | Key Advantage |
|---|---|---|
| Stem Cuttings | Trailing plants, plants with woody stems | Most versatile and beginner-friendly |
| Division | Plants with multiple growth points, clusters | Allows multiple plants from one parent |
| Leaf Propagation | Succulents, some tropical plants | Creates new plants from just a leaf |
| Air Layering | Larger, woody houseplants | Encourages roots before detaching cutting |
Step 3: Prepare the Cuttings for Propagation
Cutting preparation represents the most delicate and crucial phase in houseplant propagation, where precision and careful selection determine your success. This step transforms a simple plant segment into a potential new living organism, requiring meticulous attention and strategic approach.
According to Missouri Extension, selecting the right plant material is fundamental. Ideal cuttings emerge from healthy, vigorous parent plants during their active growth phase. Look for stems that are neither too woody nor too soft, representing the perfect balance of maturity and flexibility.
Cutting Selection Criteria:
- Choose stems 4-6 inches long
- Select segments with multiple leaf nodes
- Ensure plant material is free from disease or damage
- Pick stems from the upper, healthier sections of the plant
The cutting process requires surgical precision. Using sterilized, sharp pruning shears or a razor blade, make a clean diagonal cut just below a leaf node. This angled cut increases the surface area for potential root development and prevents water from pooling on the cut surface, which could invite fungal infections.
Immediate post-cutting care is critical.
 Remove the lower leaves from your cutting, leaving only 2-3 leaves at the top. These remaining leaves will continue photosynthesis while the cutting develops roots. For larger leaves, consider trimming them in half to reduce moisture loss and support the cutting’s energy conservation.
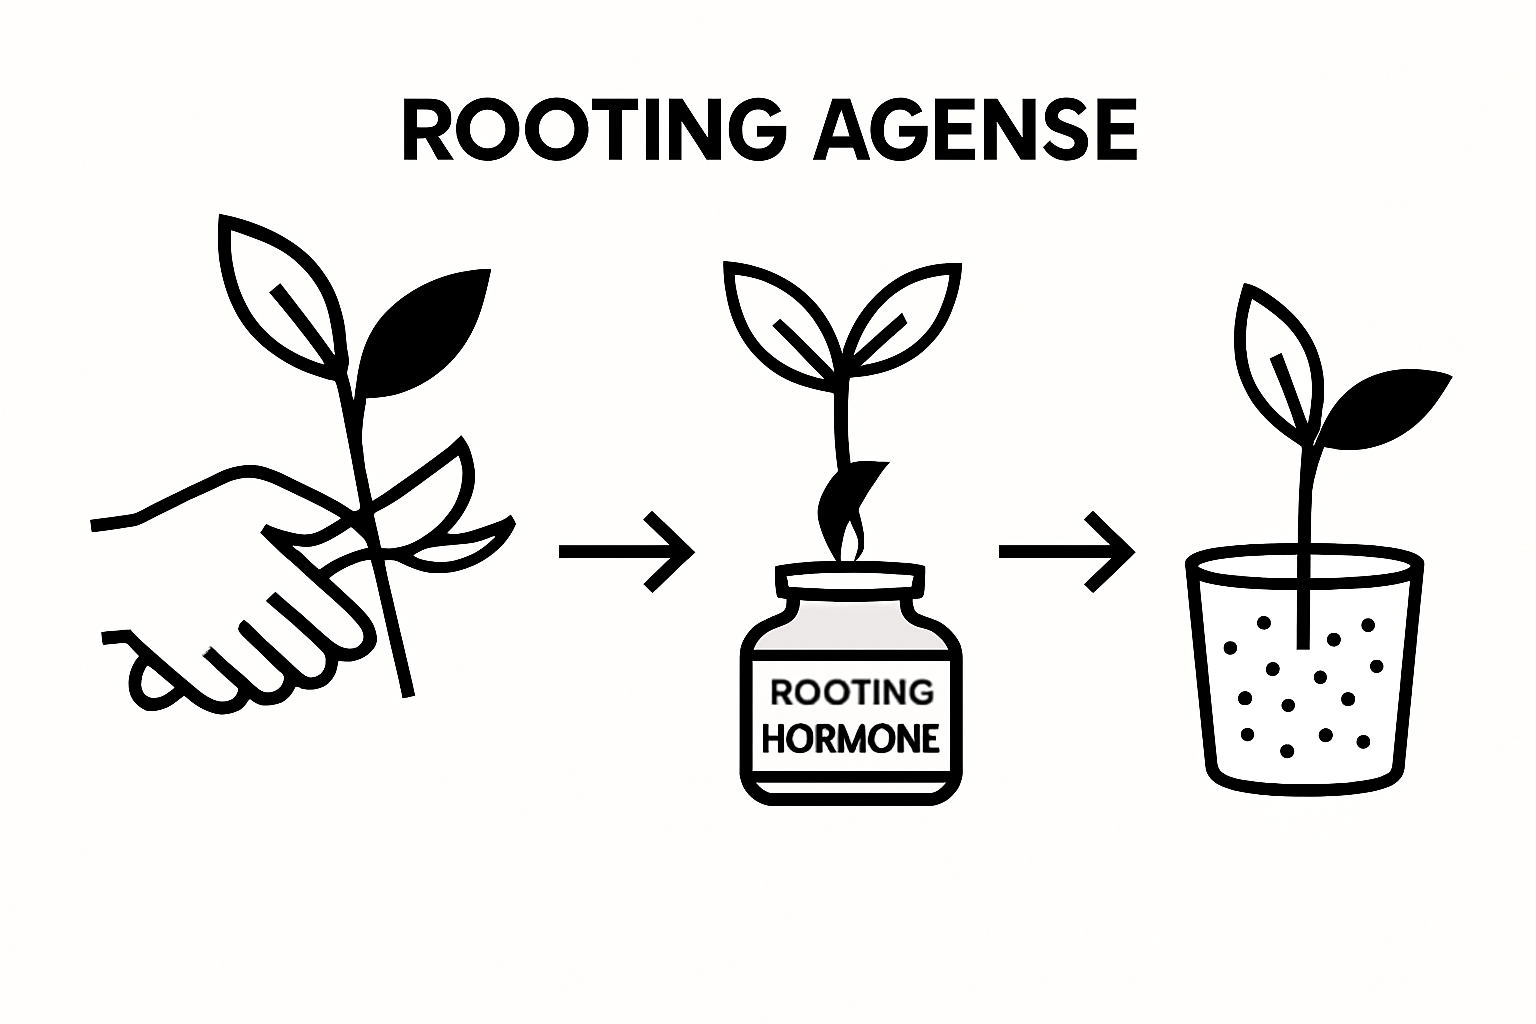
Rooting hormone application represents a game-changing technique in propagation.
Gently dip the cut end of your stem into rooting powder or gel, ensuring a light, even coating. This hormone stimulates root cell development, significantly increasing your chances of successful propagation. Be cautious not to over-apply the hormone, as excessive amounts can actually inhibit root growth.
Create an ideal microenvironment for your cutting by preparing a humidity chamber. Place the prepared cutting in a clean container filled with a well-draining propagation mix like perlite, vermiculite, or a combination of peat moss and sand. Cover the container with a clear plastic bag, creating a miniature greenhouse that maintains consistent moisture and warmth.
Position your humidity chamber in a location with bright, indirect light. Avoid direct sunlight, which can overheat the delicate cutting. Maintain consistent temperature around 70-75 degrees Fahrenheit, providing the optimal conditions for root initiation and development.
Successful cutting preparation transforms a simple plant segment into a potential new botanical life, bridging the gap between parent and offspring with careful, intentional technique.
Step 4: Plant the Cuttings in Suitable Medium
Planting your prepared cuttings represents a pivotal moment in propagation, where careful medium selection and precise technique determine the potential success of your new plant. This step transforms your carefully selected cutting into a potential independent organism, requiring strategic placement and nurturing environmental conditions.
According to University of Missouri Extension, selecting the right rooting medium is crucial for successful propagation. A well-designed growing environment provides the perfect balance of drainage, aeration, and moisture retention that encourages robust root development.
Ideal Rooting Medium Components:
- Perlite for lightweight aeration
- Coarse sand for drainage
- Peat moss for moisture retention
- Vermiculite for nutrient holding
Prepare your chosen container by filling it with a sterile, well-draining propagation mix. Create small holes using a pencil or wooden stick to gently insert your prepared cuttings without damaging their delicate base. Position each cutting approximately 1-2 inches deep, ensuring the rooting hormone-treated end makes direct contact with the medium.
Moisture management becomes critical at this stage. The medium should feel consistently damp but not waterlogged. Use a fine mist spray bottle to provide gentle hydration, avoiding direct water pressure that might dislodge the cutting. If you’re measuring your plant pot for optimal sizing, choose containers that provide just enough space for initial root development.
Create a mini greenhouse effect by covering your planted cuttings with a clear plastic dome or bag. This maintains high humidity and stable temperature, critical factors for successful root initiation. Position the humidity chamber in a warm location with bright, indirect light. Avoid direct sunlight, which can overheat the delicate new growth.
Monitor your cuttings daily, checking moisture levels and watching for signs of new growth or potential issues. Gentle tugging after 2-3 weeks can help determine if roots have begun developing. Resistance when lightly pulling the cutting indicates successful root formation.
Patience is your greatest ally during this phase. Some plant species root quickly within weeks, while others may take several months to establish. Consistent, gentle care and maintaining optimal environmental conditions will maximize your propagation success.
Step 5: Provide Proper Care and Conditions
Propagation success extends far beyond the initial cutting and planting stages. The delicate period following root establishment demands meticulous attention, transforming your young plant from a fragile cutting into a robust, thriving houseplant. Consistent and thoughtful care becomes your primary strategy for nurturing new plant growth.
According to University of California Agriculture and Natural Resources, environmental conditions play a critical role in supporting your newly propagated plants. Temperature, humidity, light, and moisture interact in a complex dance that determines your plant’s survival and growth potential.
Critical Care Parameters:
- Maintain consistent temperature between 65-75°F
- Provide bright, indirect light
- Ensure 50-60% ambient humidity
- Water sparingly but consistently
- Monitor for signs of stress or disease
Light management represents a nuanced art in plant propagation. Young plants require bright, indirect sunlight that provides energy without scorching their delicate new leaves. Position your propagated cuttings near east or north-facing windows, where gentle morning light can nurture growth without intense direct exposure. If natural light proves insufficient, consider supplementing with grow lights positioned approximately 12-18 inches above your plants.
Humidity control becomes paramount during this vulnerable growth phase. Most propagated houseplants thrive in environments mimicking their tropical origins. Create a microclimate by placing a clear plastic dome or humidity tray around your young plants. Mist the surrounding area lightly, maintaining moisture without causing waterlogging. A small personal humidifier can also help maintain optimal atmospheric conditions.
Watering requires an exceptionally gentle approach. Overwatering represents the most common threat to newly propagated plants. Use a spray bottle or small watering can to provide minimal, targeted moisture. Allow the top layer of growing medium to dry slightly between waterings, preventing root rot while supporting steady growth. The goal is consistent but not saturated moisture.
As your propagated plants develop, gradually acclimate them to standard care routines. Observe their growth patterns, noting leaf development, color, and overall vigor. Successful propagation is marked by steady growth, vibrant leaf color, and the emergence of new foliage, signaling that your careful nurturing has transformed a simple cutting into a thriving, independent plant.

Step 6: Verify Rooting Success and Transplant
The moment of truth arrives when you transition your propagated cutting from a delicate new growth to an independent, established plant. Verifying root development and executing a strategic transplant represents the critical final stage of your propagation journey, transforming potential into a thriving houseplant.
According to South Dakota State University Extension, root verification requires a combination of visual inspection and gentle testing. After 2-4 weeks of careful nurturing, your cutting is ready for its most significant evaluation.
Root Development Verification Signs:
- Visible white, firm roots emerging from drainage holes
- Resistance when gently tugging the cutting
- New leaf growth appearing
- Healthy green color maintained in existing foliage
- No signs of yellowing or wilting
Begin your root verification process by carefully examining the bottom of your propagation container. Look for small, creamy white roots peeking through drainage holes, indicating successful root establishment. If your container is transparent, you can observe root development directly, watching as delicate white roots spread through the growing medium.
The gentle tug test provides a tactile method of confirming root growth. Grasp the base of the cutting and apply slight, consistent upward pressure. Resistance indicates root development, while easy movement suggests the cutting has not yet established a robust root system. This test requires a delicate touch to avoid damaging the fragile new roots.
Once root establishment is confirmed, prepare for transplantation.
Use the following checklist to verify if your propagated houseplant cuttings are ready for transplant based on root development and visible health signs.
| Verification Step | What to Check For | Significance |
|---|---|---|
| Inspect drainage holes | White, firm roots visible | Indicates root establishment |
| Gentle tug test | Resistance to light pulling | Confirms new roots hold cutting |
| Observe leaf growth | New leaves emerging | Sign of healthy new development |
| Assess foliage color | Healthy green, no yellowing/wilting | Suggests good plant health |
Transplant your cutting with precision, creating a small hole in the new medium and gently positioning the roots. Fill around the base, pressing softly to eliminate air pockets. Water thoroughly but carefully, allowing excess moisture to drain completely. Place the newly transplanted cutting in its familiar indirect light environment, maintaining the gentle care routine that supported its initial growth.
Successful transplantation marks the culmination of your propagation efforts.
Observe your new plant closely over the following weeks, celebrating each new leaf and celebrating your journey from a simple cutting to a flourishing houseplant.
Ready to Propagate Like a Pro? Discover Solutions for Every Step
Struggling to get your houseplant cuttings to thrive, or unsure if your tools and techniques are actually setting you up for success? “Mastering Propagating Houseplants: A Complete Guide” addresses the challenges that every home gardener faces, from choosing sterilized tools to managing moisture and light during those crucial first weeks. Missing even one vital detail can leave you with wilted cuttings and a lot of frustration.
At Lushy Gardens, you’ll find clear answers and trustworthy product recommendations to support every step you take toward successful propagation. If you want expert insights and honest feedback on the best propagation equipment and supplies, our Reviews section helps you make confident, informed decisions about what really works. Ready to avoid common setbacks and transform your next propagation project? Visit Lushy Gardens now, explore our expert guides, and start growing thriving plants today.
Frequently Asked Questions
What tools are essential for propagating houseplants?
Essential tools for propagating houseplants include sharp and clean pruning shears, sterilized cutting implements, rooting hormone, clean propagation containers, well-draining potting mix, a spray bottle for moisture control, and clear plastic bags or humidity domes.
What is the best propagation method for houseplants?
The best propagation method depends on the plant species. Common methods include stem cuttings for trailing plants, division for plants with multiple growth points, leaf propagation for succulents, and air layering for larger woody plants.
How do I prepare cuttings for propagation?
To prepare cuttings, select healthy stems 4-6 inches long, make a clean diagonal cut below a leaf node, remove lower leaves, dip the cut end in rooting hormone, and then place it in a suitable propagation mix while maintaining humidity.
How can I tell if my propagated cutting has developed roots?
You can verify root development by checking for visible white roots emerging from the drainage holes, feeling resistance when lightly tugging on the cutting, noticing new leaf growth, and ensuring that existing leaves maintain healthy color without yellowing.
Recommended
- How to Propagate ZZ Plant – A Simple Guide for Home Gardeners – Lushy Gardens
- Can You Revive a Dead Plant – Lushy Gardens
- Do Air Plants Need Sun? – Lushy Gardens
- How to Trim Snake Plant – Lushy Gardens

I’m Eleanor, a seasoned gardener with over three decades of experience tending to Mother Nature’s creations. Through Lushy Gardens, I aim to share my wealth of knowledge and help fellow plant enthusiasts uncover the wonders of gardening. Let’s dive into this journey together, one leaf at a time.


