
Table of Contents
Aloe vera is everywhere these days and with good reason. This humble houseplant is actually packed with over 75 active compounds that can transform not just your skin but your whole wellness routine. Most people think growing aloe is just about plopping a succulent in a pot and adding some water, but that approach leads to droopy leaves and a sad, struggling plant. There are a few crucial steps that turn a little green spike into a thriving home remedy powerhouse.
Quick Summary
| Key Point | Explanation |
|---|---|
| 1. Choose the right aloe variety | Select an aloe variety based on your space, light, and climate to ensure successful growth. |
| 2. Prepare an ideal potting mix | Create a well-draining potting mix using coarse sand, perlite, and potting soil to mimic desert conditions. |
| 3. Select an appropriate pot | Use a breathable pot with drainage holes and ensure it’s the right size for your aloe to promote good root health. |
| 4. Water sparingly and monitor growth | Allow soil to dry out between waterings; observe your plant’s leaves for signs of health or distress. |
| 5. Harvest leaves carefully for benefits | Cut mature, outer leaves to harvest gel; avoid cutting too many at once to ensure continued plant vitality. |
Step 1: Choose the Right Aloe Vera Varieties for Your Space
Selecting the perfect aloe vera variety is the foundation of successful plant cultivation. Not all aloe plants are created equal, and understanding the nuanced differences can make or break your gardening experience. Your choice depends on several critical factors including available space, indoor or outdoor growing conditions, and your personal gardening skill level.
Aloe vera comes in multiple varieties, each with unique characteristics that impact their growth potential. Aloe barbadensis miller represents the most common medicinal variety many home gardeners prefer. This classic species thrives in various environments and offers the most recognizable healing properties. For indoor spaces with limited sunlight, consider Aloe vera var. chinensis, a compact variety perfect for smaller apartments or windowsill gardens.
When evaluating potential aloe varieties, consider your specific growing environment. Indoor cultivators should prioritize smaller, more adaptable species that tolerate lower light conditions. Outdoor gardeners in warmer climates have more flexibility with larger, more robust aloe types that can withstand direct sunlight and temperature fluctuations. Learn more about selecting the perfect plant container to complement your chosen variety.
Key considerations for variety selection include mature plant size, growth rate, and environmental requirements. Smaller varieties like Aloe brevifolia work wonderfully in compact spaces and require minimal maintenance. Larger varieties such as Aloe arborescens demand more room but produce stunning architectural shapes that can become dramatic landscape features.
Successful aloe vera cultivation starts with matching the right variety to your specific growing conditions. Take time to assess your available space, light exposure, and commitment level before making a selection. Remember that each variety has unique water, sunlight, and care requirements that will significantly impact your plant’s health and longevity.
Step 2: Prepare the Ideal Potting Mix for Aloe Vera
Creating the perfect potting mix is crucial for aloe vera success. Unlike traditional houseplants, these succulent warriors require a specialized growing medium that mimics their native desert environments. Drainage is the most critical factor in preparing an ideal potting environment that allows your aloe to thrive without risking root rot or moisture-related complications.
A premium aloe vera potting mix combines multiple components to create the optimal growing conditions. Start by selecting a base of coarse, sandy soil that allows water to pass through quickly. Commercial cactus and succulent potting mixes work excellently, but you can also create a custom blend. Discover the best container strategies for your aloe plant to complement your carefully crafted potting mix.
To construct your ideal mix, combine equal parts standard potting soil, coarse sand, and perlite or pumice. This combination ensures excellent drainage while providing minimal organic matter for nutrient retention. Avoid using standard potting soil alone, which tends to retain too much moisture and can suffocate aloe roots. The goal is to create a lightweight, airy medium that allows roots to breathe and prevents water from pooling around the plant’s base.
Texture matters significantly in your potting mix. Aim for a grainy, loose consistency that feels almost sandy to the touch. Large particles help create air pockets that prevent compaction and allow roots to develop strong, healthy structures. When you squeeze a handful of the prepared mix, it should crumble easily and not form a dense, compact mass.
Before planting, ensure your chosen container has multiple drainage holes to complement your carefully prepared potting mix. This dual approach of specialized soil and proper drainage creates the ideal growing environment for your aloe vera, setting the stage for robust growth and long-term plant health.
Step 3: Select a Suitable Pot and Position for Growth
Selecting the perfect pot and growing location transforms your aloe vera from a simple plant into a thriving botanical companion. Pot selection is more than an aesthetic choice – it directly impacts your plant’s health, growth potential, and overall survival. The right container creates an environment where your aloe can develop strong roots and maintain optimal moisture levels.
Ceramic, terracotta, and clay pots work best for aloe vera because they provide excellent breathability and natural moisture regulation. Choose a container with multiple drainage holes to prevent water accumulation that could lead to root rot. The pot should be approximately 1-2 inches larger than the plant’s root system, providing enough space for growth without overwhelming the delicate root structure. Explore our comprehensive guide to selecting the perfect plant pot to ensure you make the most informed decision.
Light positioning plays a crucial role in aloe vera cultivation. These succulents thrive in bright, indirect sunlight – think of a location near an east or west-facing window that provides consistent illumination without harsh midday rays. Indoor spaces with temperatures between 55-80 degrees Fahrenheit create ideal growing conditions. Avoid placing your aloe in direct afternoon sunlight, which can scorch the leaves and cause permanent damage.
When positioning your aloe, consider rotating the pot quarter-turn every few weeks to ensure even light exposure. This practice prevents the plant from leaning or growing asymmetrically and promotes balanced, healthy development. Watch for signs of light stress such as pale, bleached leaves or brown scorched edges, which indicate your plant might need slight repositioning.
Successful aloe vera placement requires observing and responding to your plant’s specific needs. Pay attention to how your chosen location impacts the plant’s color, leaf firmness, and overall vigor. A well-positioned aloe will display plump, vibrant green leaves and demonstrate steady, consistent growth.

Step 4: Plant Aloe Vera Properly and Water Sparingly
Properly planting your aloe vera requires precision and understanding of the plant’s unique growth requirements. Transplanting is a delicate process that can make or break your plant’s future health and vitality. The goal is to create an environment that mimics the aloe’s natural desert habitat while providing just enough support for robust growth.
Begin by gently removing the aloe from its existing container, carefully brushing away excess soil from the roots. Inspect the root system carefully for any signs of damage or rot – healthy roots should appear firm and white or light tan. If you encounter any mushy or dark-colored roots, trim them away using clean, sharp pruning shears to prevent potential disease spread. Learn techniques for reviving struggling aloe plants if you encounter any unexpected challenges during transplanting.
When positioning the plant in its new pot, ensure the base sits slightly above the soil line. This technique prevents water from accumulating around the plant’s base and reduces the risk of root rot. Gently backfill around the roots with your prepared succulent mix, pressing lightly to eliminate air pockets without compacting the soil. The key is creating a loose, breathable environment that allows roots to spread and develop naturally.
Watering represents perhaps the most critical aspect of aloe vera care. These desert plants thrive on minimal moisture, requiring a counterintuitive approach to traditional plant care. Allow the soil to dry completely between waterings – typically every 2-3 weeks during growing season and even less frequently during winter months. When you do water, do so deeply but infrequently, allowing water to drain completely through the pot’s bottom holes.
Successful aloe planting is about observation and restraint. Watch for subtle signs of plant health: plump, firm leaves indicate proper care, while wrinkled or discolored leaves suggest either overwatering or underwatering. Your aloe will communicate its needs if you learn to read its unique language of growth and adaptation.
Use this troubleshooting table to quickly identify and resolve common issues when growing aloe vera, based on visible symptoms and causes discussed in this guide.
| Problem | Possible Cause | Solution |
|---|---|---|
| Soft, drooping, discolored leaves | Overwatering or poor drainage | Allow soil to dry, improve potting mix |
| Pale or bleached leaves | Insufficient light | Move to brighter, indirect sunlight |
| Scorched or brown-edged leaves | Too much direct sun | Relocate to filtered or indirect light |
| Wrinkled leaves | Underwatering | Water deeply, ensuring soil drains well |
| Presence of “pups” or offsets | Healthy, mature plant | Optionally separate and repot when large enough |
| Tiny white cottony masses | Mealybugs | Inspect and treat with appropriate remedies |
| Small brown bumps or webbing | Scale insects or spider mites | Rinse leaves and apply pest control |
Step 5: Monitor Growth and Care for Healthy Aloe Vera
Monitoring your aloe vera’s growth requires a keen eye and understanding of its subtle communication signals. Successful plant care is about reading the plant’s language – every leaf, color change, and growth pattern tells a story about its overall health and environmental conditions. Consistent observation transforms you from a simple caretaker to a responsive plant guardian.
Leaf appearance provides the most immediate insight into your aloe’s wellbeing. Healthy aloe leaves should be plump, firm, and a vibrant green to bluish-green color. Soft, drooping, or discolored leaves indicate potential issues with watering, light exposure, or root health. Discover expert techniques for reviving struggling aloe plants if you notice persistent problems with your plant’s appearance.
Growth patterns reveal crucial information about your plant’s overall condition. Aloe vera naturally produces offspring called pups or offsets, which emerge from the base of the parent plant. These small plantlets represent a sign of robust health and provide opportunities for propagation. When pups reach approximately one-third the size of the parent plant, you can carefully separate and replant them, expanding your aloe collection.
Seasonal care requires adapting your approach to changing environmental conditions. During summer months, aloe plants experience active growth and might require slightly more frequent watering. Winter brings a dormant period where water requirements dramatically decrease. Reduce watering frequency by 50-70% during cooler months, allowing the soil to dry completely between waterings. Temperature fluctuations between 55-80 degrees Fahrenheit provide the most stable growing environment.
Pest management represents another critical aspect of aloe vera care. While these succulents are relatively resistant, they can occasionally attract mealybugs, scale insects, and spider mites. Regular visual inspections help catch potential infestations early. Look for tiny white cottony masses, small brown bumps on leaves, or fine webbing – these are early warning signs that demand immediate attention and potentially targeted treatment.
Step 6: Harvest and Use Aloe Vera for Maximum Benefits
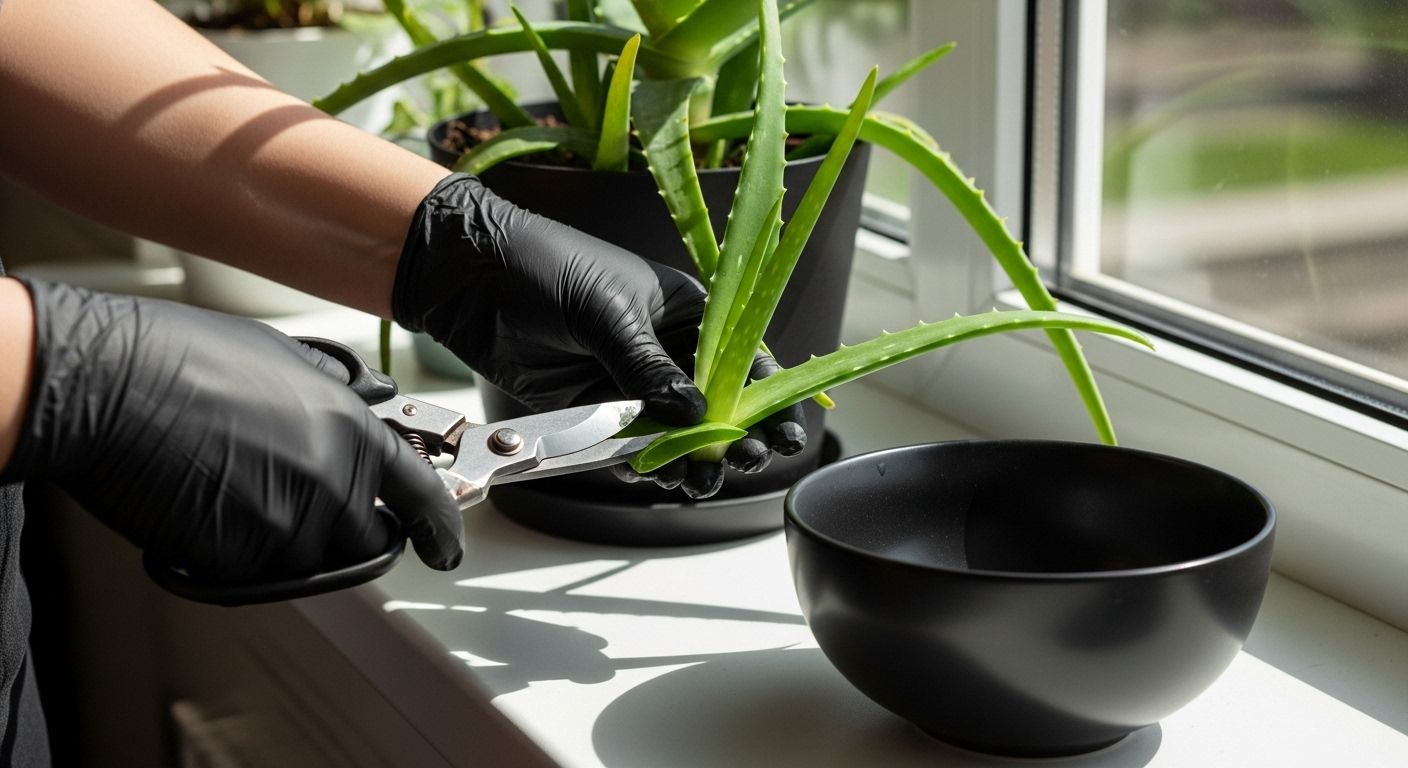
Harvesting aloe vera transforms your plant from a decorative succulent into a powerful natural remedy. Timing and technique are crucial when extracting the plant’s healing gel, requiring a delicate balance of precision and care. The most mature outer leaves provide the highest concentration of beneficial compounds, making them ideal for harvesting.
To harvest, select leaves that are thick, plump, and dark green – indicators of peak nutritional value. Use a sharp, clean knife or pruning shears to cut leaves close to the plant’s base, always cutting at a slight angle to prevent water accumulation. Explore our comprehensive guide for plant recovery techniques if you encounter any challenges during the harvesting process.
Processing the harvested leaf requires careful technique. Begin by washing the leaf thoroughly to remove any dirt or debris. Next, carefully slice off the serrated edges using a clean knife. Slice the leaf lengthwise, revealing the clear, translucent gel inside. Carefully scrape the gel using a spoon, collecting it in a clean glass or ceramic container. The goal is extracting the pure, inner gel without including the yellow latex layer, which can cause skin irritation.

Aloe vera gel offers numerous applications beyond topical skin treatments. You can use fresh gel for soothing sunburns, minor cuts, and skin irritations. Blend the gel into smoothies for potential digestive benefits, or create homemade skincare masks by mixing it with other natural ingredients. Store unused gel in an airtight container in the refrigerator for up to one week, ensuring maximum potency and preventing bacterial growth.
Consistent harvesting promotes continued plant health and encourages new growth. Never remove more than one-third of the plant’s leaves at a time, allowing sufficient energy for regeneration. Observe your plant’s recovery between harvests, ensuring you maintain a balanced approach that supports both your wellness needs and the plant’s ongoing vitality.
Transform Your Aloe Vera Success with Lushy Gardens
Growing aloe vera brings unique challenges, from finding the right variety to mastering soil mix and pot selection. Many beginners struggle with issues like root rot, improper watering, or slow plant growth because it is easy to miss key details. If you have ever been unsure about plant positioning or puzzled by signs of distress in your aloe, you are not alone. Lushy Gardens understands the frustration and confusion that can hold you back from growing healthy, thriving aloe plants at home.
You do not have to figure it all out by yourself. Tap into expert support and actionable advice designed for your needs. Explore our best pot for aloe plant guide to ensure your plant gets the environment it deserves. If you encounter unexpected issues, visit our resource on how to save an aloe plant and get solutions fast. Ready to take your gardening journey a step further? Start exploring at Lushy Gardens today and get the confidence to grow your healthiest aloe vera now.
Frequently Asked Questions
How often should I water my aloe vera plant?
Aloe vera plants thrive on minimal moisture. Water deeply but infrequently, allowing the soil to dry completely between waterings. Typically, water every 2-3 weeks during the growing season and even less frequently in winter.
What type of potting mix is best for aloe vera?
A premium potting mix for aloe vera should consist of coarse, sandy soil with excellent drainage. A common recipe includes equal parts standard potting soil, coarse sand, and perlite or pumice to create a lightweight, airy medium.
How do I know if my aloe vera plant is getting enough sunlight?
Aloe vera plants thrive in bright, indirect sunlight. Indoor locations near east or west-facing windows are ideal. Signs of insufficient light include pale leaves or elongated growth, while scorched leaves can indicate too much direct sunlight.
When is the best time to harvest aloe vera leaves?
Harvest the outer leaves of the aloe vera plant when they are thick, plump, and dark green, indicating peak nutritional value. Be sure to leave more than one-third of the leaves on the plant to maintain its health and regeneration capabilities.
Recommended
- Best Pot for Aloe Plant
- How to Save an Aloe Plant
- Why Is My Aloe Plant Turning Brown
- Why Is My Aloe Plant Drooping?

I’m Eleanor, a seasoned gardener with over three decades of experience tending to Mother Nature’s creations. Through Lushy Gardens, I aim to share my wealth of knowledge and help fellow plant enthusiasts uncover the wonders of gardening. Let’s dive into this journey together, one leaf at a time.


