
Table of Contents
Did you know that nearly 70 percent of common houseplant issues are linked to improper care routines? Keeping your green companions thriving is more challenging than it seems. Whether your plant leaves are drooping or showing strange spots, a careful rescue plan can make all the difference. This guide helps you pinpoint what your plant needs, fix common problems, and bring wilting greenery back to life.
Quick Summary
| Key Point | Explanation |
|---|---|
| 1. Systematically Assess Plant Symptoms | Observe and document your plant’s symptoms to identify potential environmental or disease-related issues. |
| 2. Adjust Watering Accurately | Implement a proper watering schedule by checking soil moisture to avoid root health issues. |
| 3. Use Natural Remedies Wisely | Integrate natural nutrients like Epsom salt and coconut sugar to enhance plant vitality and recovery. |
| 4. Prune Damaged Areas for Recovery | Remove unhealthy sections strategically to encourage healthy growth and improve air circulation. |
| 5. Monitor Plant Progress Consistently | Keep a recovery journal to track changes and adjust care based on your plant’s unique needs. |

Step 1: Assess Plant Symptoms and Identify Causes
Let’s play plant detective. Your first mission is to carefully examine your struggling green friend and understand exactly what’s causing its decline. According to research from the American Phytopathological Society, successful plant rescue starts with a scientific diagnostic approach that goes beyond simple observation.
Begin by taking a comprehensive look at your plant. Observe its entire structure carefully. Are leaves turning yellow? Dropping prematurely? Showing brown spots or discoloration? These visual cues are your first clues. As Penn State University’s extension experts recommend, you want to distinguish between environmental stressors and potential disease issues.
Environmental factors play a massive role in plant health. Check your plant’s immediate surroundings. Is it receiving proper sunlight? Are temperature and humidity appropriate? Soil conditions matter immensely too. Perform a simple touch test: Is the soil too dry or waterlogged? Overly compacted? Each of these conditions signals a different potential problem.
Pro Tip: Take clear, well-lit photos of your plant from multiple angles. These can help you track changes and provide valuable visual evidence if you need expert consultation later.
Classify your observations systematically. Look for patterns in tissue development problems. Are leaves showing signs of under or overdevelopment? Are there visible necrotic areas? Pay attention to how symptoms progress and whether they seem specific to your particular plant species.
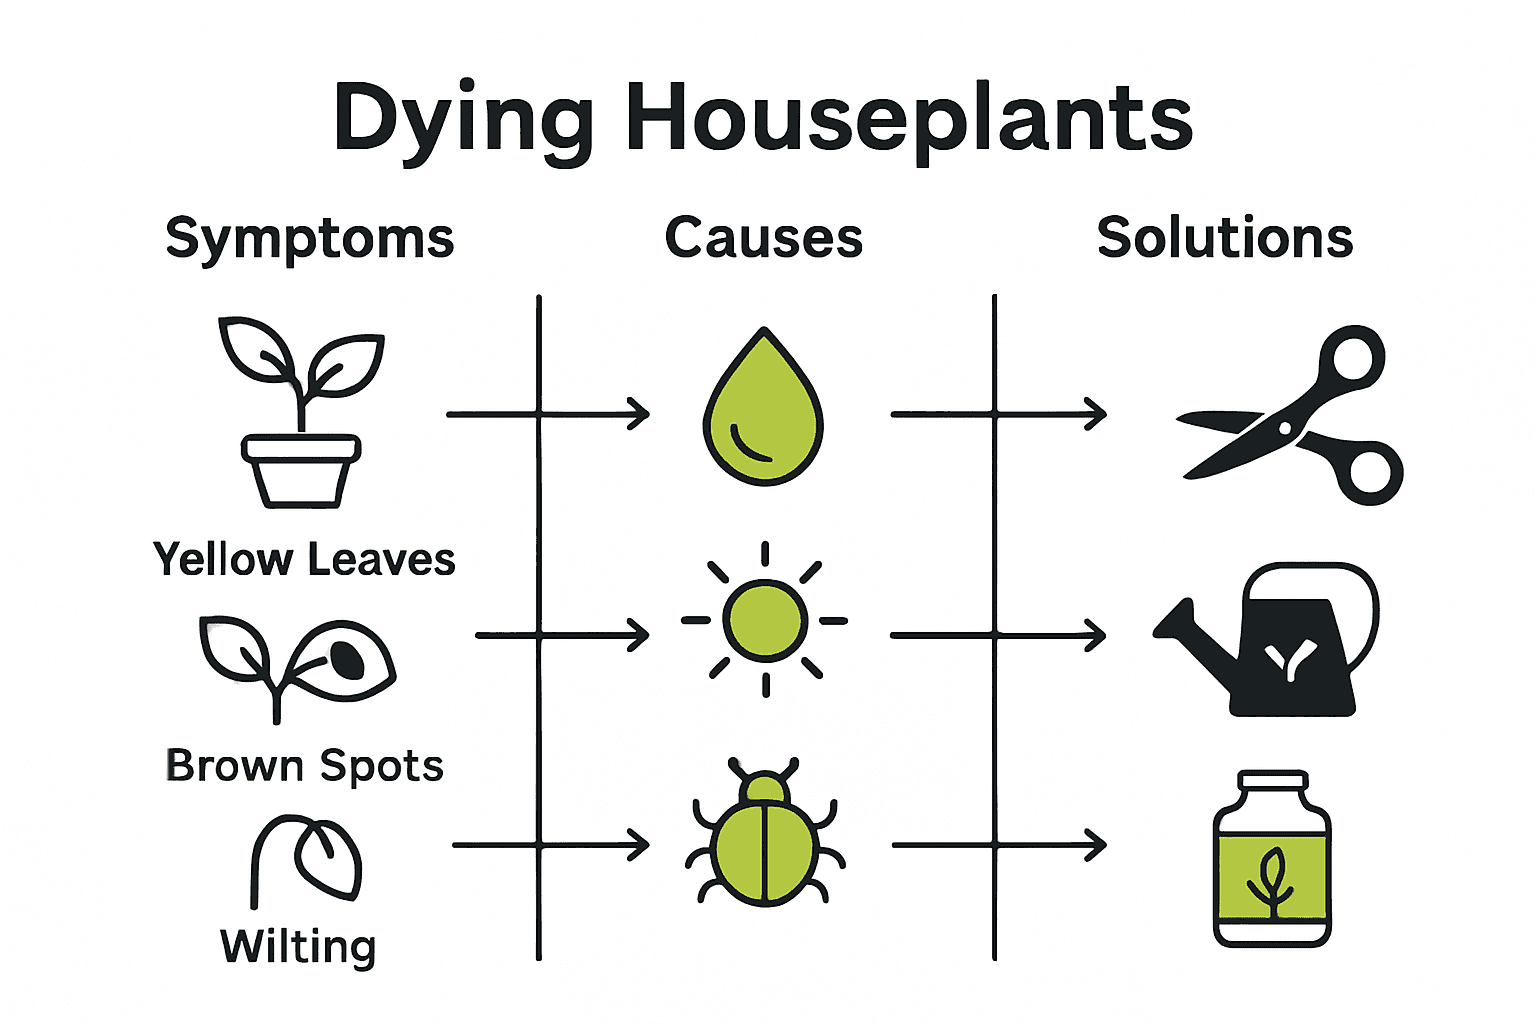
Here’s a comparison of common plant symptoms, likely causes, and suggested actions:
| Symptom | Likely Cause | Suggested Action |
|---|---|---|
| Yellowing leaves | Overwatering Nutrient deficiency |
Check soil moisture Add fertilizer |
| Brown spots | Fungal disease Sunburn |
Improve air flow Adjust lighting |
| Wilting | Underwatering Root issues |
Water thoroughly Inspect roots |
| Dropping leaves | Environmental stress | Adjust temperature/humidity |
| Mushy roots | Root rot Overwatering |
Prune damaged roots Repot in dry soil |
| Stunted growth | Poor soil Lack of nutrients |
Use quality soil Add nutrients |
Your goal is to narrow down potential causes. Is this a biotic issue (caused by living organisms like fungi or pests) or an abiotic problem (environmental stress)? Our guide on understanding indoor plant pests can help you identify potential biological culprits.
Ready to dive deeper into plant rescue mode? The next step involves understanding the specific symptoms and matching them to potential treatments.
Step 2: Adjust Watering and Soil Conditions
Time to become a watering wizard. Your plant’s survival depends on getting moisture just right. According to research from UC Agriculture and Natural Resources, both under and over watering can spell disaster for your green companion.
First, assess your current watering approach. Are you drowning your plant or leaving it parched? Underwatering causes wilting and gradual plant dieback, while overwatering creates a dangerous environment for root health. Wikipedia’s plant care research reveals that excess water leads to root asphyxiation and makes plants vulnerable to harmful pathogens.
Check your soil moisture like a detective. Stick your finger about two inches into the soil. If it feels dry and crumbly, your plant needs water. If it feels soggy or smells musty, you are overwatering. Proper drainage is your plant’s best friend. Consider mixing perlite or sand into your potting mix to improve water flow and prevent soil compaction.
Pro Tip: Different plants have different water needs. Learn how to water indoor plants naturally to match each plant’s unique requirements.
For struggling plants, you might need to perform plant surgery. Carefully remove the plant from its pot and inspect the roots. Healthy roots look firm and white or light tan. Dark, mushy, or foul-smelling roots indicate root rot. Trim away damaged roots using clean, sharp scissors and replant in fresh, well-draining soil.
Adjust your watering schedule based on your plant’s specific needs. Some plants prefer letting the soil dry completely between waterings. Others need consistent moisture. Observe your plant’s response and be ready to adapt your approach.
Ready to give your plant a new lease on life? The next step involves providing the right nutrients and environment for recovery.
Step 3: Revitalize with Natural Remedies and Nutrients
Nature has powerful healing secrets for struggling plants. Your mission now is to transform your plant’s health using simple natural remedies that can jumpstart recovery and boost overall vitality.
Let’s talk natural nutrients. According to The Spruce, Epsom salt can be a miracle worker for plant rehabilitation. Dissolve a small amount of magnesium sulfate in water to improve nutrient absorption and stimulate robust foliage growth. But proceed with caution. Too much can disrupt soil balance.
Another secret weapon is coconut sugar. As Tom’s Guide research reveals, this natural ingredient can feed beneficial soil microbes and help plants recover from environmental stress. Mix a teaspoon of organic coconut sugar into your watering routine to provide a micronutrient boost.
Pro Tip: Always test treatments on a small section of your plant first to ensure compatibility.
Consider organic fertilizers for long term plant health. Check out our guide on the best indoor plant fertilizers to understand which nutrients work best for different plant types. Compost tea organic liquid fertilizers work wonders for most struggling plants.
Observe your plant closely after applying these natural remedies. Healthy plants respond quickly with renewed color and leaf firmness. Give your plant time to recover and adjust to its new nutritional support system.
Ready to take your plant rescue mission to the next level? The upcoming steps will help you create the perfect healing environment.
Step 4: Prune Damaged Areas and Encourage Growth
Pruning is like giving your plant a strategic haircut. Your goal is to remove damaged sections and help your plant redirect its energy toward healthy growth. According to horticultural research from Agriculture Institute, strategic pruning can dramatically improve plant health by enhancing sunlight penetration and air circulation.
Start by gathering clean sharp scissors or pruning shears. Carefully examine each branch and leaf. Look for signs of disease such as discoloration, mushy texture, or unusual spots. Remove these sections by cutting just above a leaf node at a 45 degree angle. This angle helps water slide off and prevents potential infection.
Research from Live to Plant suggests advanced techniques like coppicing can stimulate plant regrowth from dormant buds. For most home gardeners, the key is making clean precise cuts and creating optimal recovery conditions.
Pro Tip: Always sterilize your cutting tools with rubbing alcohol between cuts to prevent spreading potential diseases.
After pruning, focus on creating the perfect recovery environment. Ensure consistent moisture, gentle indirect light, and minimal stress. Our guide about reviving seemingly dead plants offers additional insights for challenging plant rescue scenarios.
Monitor your plant closely after pruning.
New growth signals successful recovery. Some plants might take weeks to show improvement so patience is crucial. Watch for fresh green shoots emerging from pruned areas.
Ready to help your plant bounce back to vibrant health? The next steps will fine tune your plant rescue strategy.
Step 5: Monitor Progress and Make Ongoing Improvements
Congratulations. You are now entering the most critical phase of plant rescue recovery. According to research from Live to Plant, successful plant rehabilitation requires meticulous observation and strategic tracking.
Start by creating a plant recovery journal. Take detailed photographs of your plant from multiple angles every few days. Note specific changes in leaf color, stem strength, and overall appearance. Digital photos help you track subtle transformations that might be easy to miss in person.
Research from the University of Maryland Extension emphasizes that most plant problems are abiotic meaning they stem from environmental conditions. This makes ongoing monitoring absolutely crucial. Check soil moisture levels regularly. Observe root health during your periodic inspections. Look for signs of new growth and emerging healthy leaves.
Pro Tip: Use a magnifying glass to examine leaf surfaces and detect early signs of potential issues.
Dont panic if recovery seems slow. Our guide on reviving seemingly dead plants can provide additional insights for challenging scenarios. Some plants take weeks to show significant improvement. Patience and consistent care are your best tools.
Adjust your care routine based on your observations. If new growth appears weak, consider modifying light exposure or nutrient balance. If roots look stressed, reassess your watering technique. Each plant is unique and requires personalized attention.
Your plant rescue mission is almost complete. Stay vigilant and celebrate every small sign of recovery.
Rescue Your Struggling Plants With Expert Support
Watching a cherished plant decline can be stressful and discouraging. You want fast, natural solutions that work—and the right guidance to pinpoint whether watering issues, poor soil, pests, or environmental factors are the real culprits. This step-by-step guide emphasizes root health, proper diagnosis, and simple remedies, but the journey to healthy plants does not end here.
Move beyond the basics and unlock proven strategies from our team at Lushy Gardens. If you need help with recurring problems or want to deepen your knowledge, browse our dedicated Plant Care section for practical advice tailored to your plant’s unique challenges. Get specific answers about pests and diseases in our Pest & Disease Management resource. Take the next step today—visit our site and discover the trusted community and expert tips that can help you revive and maintain every plant in your home.
Frequently Asked Questions
How can I identify the causes of my plant’s decline?
To identify the causes of your plant’s decline, assess its symptoms closely. Look for visual cues like yellowing leaves or wilting, and check environmental factors like soil moisture and light conditions.
What should I do if my plant has root rot?
If your plant has root rot, prune off any damaged roots using clean scissors. Repot the plant in fresh, well-draining soil to prevent further root issues and improve its health.
How often should I adjust my watering routine for a struggling plant?
Adjust your watering routine based on the specific needs of your plant, typically every 1 to 2 weeks. Check the soil moisture before watering; if the top two inches are dry, it’s time to water.
Can I use natural remedies to revive my dying plants?
Yes, you can use natural remedies like Epsom salt and coconut sugar to help your plants recover. Mix a small amount of Epsom salt into your water once a month to enhance nutrient absorption and boost growth.
How can I monitor my plant’s recovery over time?
To monitor your plant’s recovery, keep a journal documenting changes in appearance, such as leaf color and new growth. Take photos every few days to visually track improvements and adjust care as needed.
What should I do if my plant’s leaves are dropping?
If your plant’s leaves are dropping, examine environmental conditions like temperature and humidity. Adjust these factors as needed, and ensure your plant is receiving adequate water to encourage leaf retention.
Recommended
- Can You Revive a Dead Plant – Lushy Gardens
- How to Save an Aloe Plant: Revival Techniques and Care Tips – Lushy Gardens
- Mastering Propagating Houseplants: A Complete Guide – Lushy Gardens
- Indoor Plants – Lushy Gardens

I’m Eleanor, a seasoned gardener with over three decades of experience tending to Mother Nature’s creations. Through Lushy Gardens, I aim to share my wealth of knowledge and help fellow plant enthusiasts uncover the wonders of gardening. Let’s dive into this journey together, one leaf at a time.


