
Table of Contents
Even the healthiest houseplant can suffer if kept in the wrong pot or neglected during repotting. In fact, improper repotting is a leading cause of stress and decline for indoor plants. Choosing the correct container and using the right materials can be the difference between drooping leaves and a thriving green companion. Discover clear, practical tips to make every step of repotting easy and stress-free for you and your plants.
Quick Summary
| Key Point | Explanation |
|---|---|
| 1. Choose the Right Pot | Select a pot 1-2 inches larger with drainage holes for optimal growth. |
| 2. Handle the Plant Gently | Carefully remove the plant from its pot to minimize stress and avoid damaging the roots. |
| 3. Inspect Roots for Health | Ensure roots are healthy; trim any damaged or mushy roots before repotting to promote growth. |
| 4. Position Plant Correctly | Place the plant at the same soil level, ensuring it’s centered and gently packed with soil to prevent air gaps. |
| 5. Water and Monitor Recovery | Water thoroughly post-repotting and observe for new growth or signs of stress in the following weeks. |
Step 1: Select the Right Pot and Gather Materials
Successfully repotting a plant starts with selecting the right container and preparing your materials. This step is crucial for giving your plant the best possible environment to thrive and grow.
According to University of Maryland Extension, choosing a pot that is slightly larger than the current one with adequate drainage holes is essential. When selecting your new pot, look for containers that are about 1 to 2 inches wider in diameter than your plant’s current home. Ceramic, terracotta, and plastic pots all work well as long as they have drainage holes at the bottom.
For materials, you will need:
- Fresh potting mix
- Your chosen pot
- Gardening gloves
- Pruning shears (optional)
- Newspaper or drop cloth to protect your work surface
Pro tip: Avoid using standard garden soil for potting. As the research suggests, opt for a porous potting medium that contains ingredients like peat moss, vermiculite, and perlite. These components help retain moisture and nutrients while allowing proper aeration for your plant’s roots.
Now that you have your materials ready, you are prepared to move on to the next step of removing your plant from its current pot and preparing it for transplanting.

Step 2: Remove the Plant Safely from Its Old Pot
Removing your plant from its current pot is a delicate process that requires patience and gentle handling. The goal is to minimize stress on the plant while successfully extracting it from its existing container.
According to the Chicago Botanical Garden, the safest method for removing a plant involves a few simple steps. Start by gently squeezing the sides of the pot to loosen the soil. Then, place one hand over the top of the pot with the plant stem carefully positioned between two fingers. Carefully tip the pot upside down, allowing the plant to slide out smoothly into your hand.
Pro tip: If the plant seems stuck, do not pull or tug forcefully. Instead, try running a clean butter knife around the inside edge of the pot to help loosen the root ball. For plants in plastic containers, you can gently tap the bottom and sides of the pot to help release the roots.
While removing the plant, take a moment to inspect the root system. Healthy roots should look white or light tan and have a firm texture. Any dark, mushy, or extremely tangled roots might indicate potential issues that will need attention during the repotting process.
With your plant now carefully removed from its old pot, you are ready to examine the roots and prepare for the next step of the repotting process.
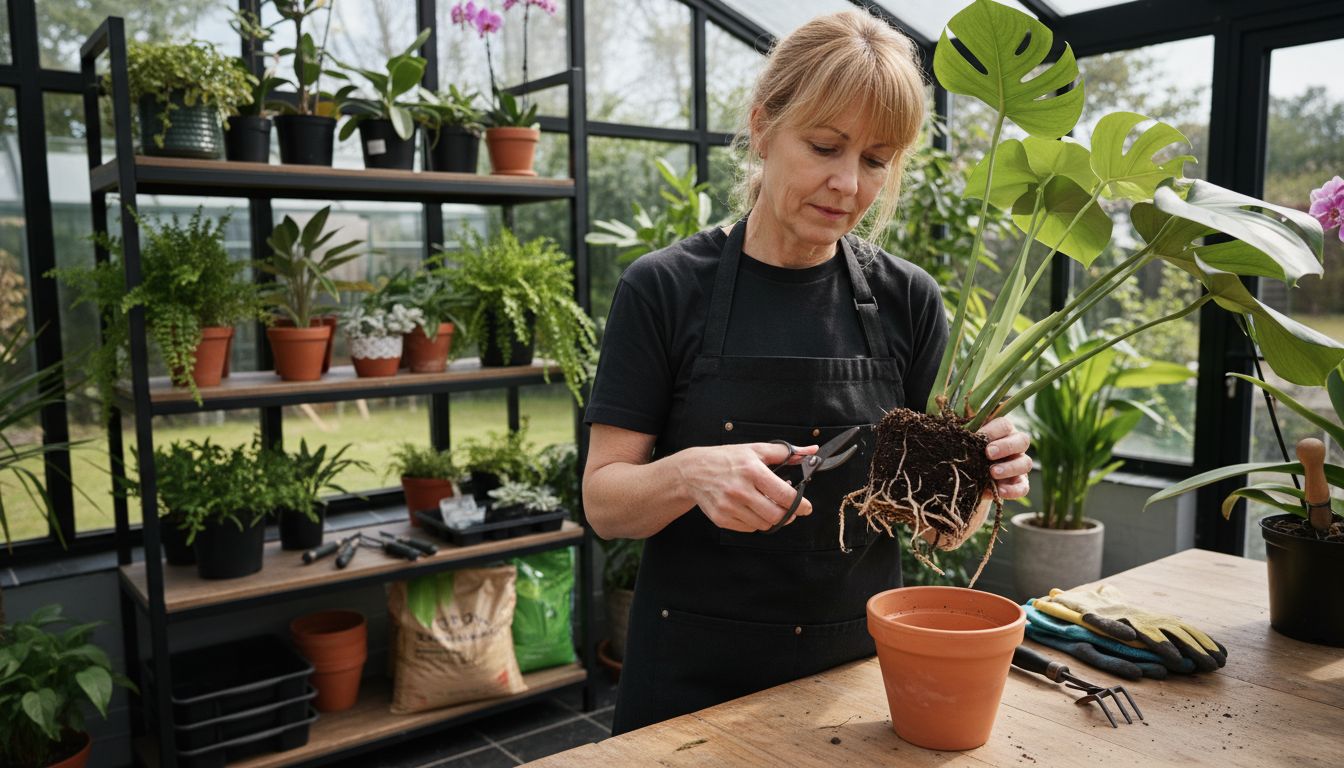
Step 3: Loosen Roots and Inspect for Health Issues
After carefully removing your plant from its old pot, the next crucial step is to prepare the root system for its new home. This process involves gently untangling roots and checking their overall health to ensure your plant thrives in its new environment.
According to Architectural Digest, you should start by working your hands through the roots gently, beginning at the bottom and moving upward. This technique helps loosen and untangle the roots, creating space for better water absorption, air circulation, and nutrient intake. As recommended by Ottawa Flowers, take this opportunity to carefully inspect the roots for any signs of disease or damage.
While examining the roots, look for these key indicators of plant health:
- Healthy roots should appear white or light tan
- Roots should feel firm and sturdy
- Avoid roots that are dark, mushy, or smell unpleasant
Pro tip: Always use sterilized scissors when trimming roots. Cut away any dead, discolored, or overly tangled roots to promote healthy growth. Make clean cuts and remove only the minimum necessary to maintain the plant’s overall root structure.
With your roots now carefully inspected and prepared, you are ready to move on to the next exciting stage of repotting your plant.
Step 4: Position the Plant in Its New Pot Properly
With your roots prepared and ready, the next critical step is carefully positioning your plant in its new home. This process requires precision and gentle handling to ensure your plant can establish itself successfully in the fresh pot.
According to the Chicago Botanical Garden, the key is to place the plant so that its soil surface around the stem matches the previous container’s level. The University of Maryland Extension recommends positioning the plant in the center of the new pot, carefully filling soil around the root ball and gently tamping it down with your fingers to eliminate any potential air pockets.
When positioning your plant, keep these important guidelines in mind:
- Center the plant in the new pot
- Maintain the same soil depth as in the previous container
- Fill soil gently around the roots
- Press soil lightly to remove air gaps
Pro tip: Take your time during this step. Rushing can damage delicate roots or create uneven soil distribution. Gently rotate the pot as you add soil to ensure even coverage and support for your plant.
With your plant now nestled securely in its new pot, you are ready to complete the final stages of repotting and help your plant thrive in its refreshed environment.
Step 5: Add Fresh Soil and Water Thoroughly
You are now in the final stages of repotting your plant. This crucial step involves carefully adding fresh soil and providing the perfect initial watering to help your plant settle into its new environment.
According to the Chicago Botanical Garden, you should add soil around the plant until it is approximately ½ inch below the top edge of the container. The University of Maryland Extension recommends gently firming the fresh potting mix around the root ball to eliminate any potential air pockets.
When adding soil and watering, follow these key guidelines:
- Fill soil gently around the plant
- Avoid compacting the soil too firmly
- Water until liquid flows through drainage holes
- Allow excess water to drain completely
Pro tip: After initial watering, resist the temptation to water again too quickly. Wait until the top layer of soil feels dry to the touch to prevent overwatering and potential root rot.
With your plant now repotted, watered, and settled, you have successfully completed the entire repotting process. Your plant is now ready to thrive in its refreshed home.
Step 6: Check for Stability and Monitor Plant Recovery
Congratulations on completing the repotting process. The final stage involves carefully assessing your plant’s transition and ensuring it settles comfortably into its new environment.
According to the Chicago Botanical Garden, you should first ensure the plant is stable and upright in its new pot. The University of Maryland Extension recommends monitoring the plant over the following weeks for signs of new growth or potential stress.
Watch for these key indicators of plant health and recovery:
- Consistent positioning without leaning
- Firm root establishment
- Continued green leaf color
- New growth emerging within 2 to 4 weeks
Pro tip: If you are wondering whether your plant might need additional support, check for any signs of plant distress with our guide on saving dying plants. Some plants take longer to adjust, so patience is key during this recovery period.
During the first few weeks, maintain consistent care routines and avoid making dramatic changes to your plant’s environment.
Your careful attention will help ensure a successful transition to its new home.

Grow Stronger Plants with Expert Care from Lushy Gardens
Repotting plants is a vital step to encourage healthy root growth and vibrant foliage but it can also feel challenging. You want to avoid stressed roots and uneven soil that slow your plant’s recovery. This guide emphasizes proper root inspection, gentle soil filling, and correct pot selection to help your plants flourish. If you have faced struggling indoor plants or worry about their recovery after repotting, you are not alone.
Discover a wealth of detailed advice on nurturing your plants with our comprehensive Plant Care – Lushy Gardens resources. Whether you are dealing with delicate indoor varieties or need insight on preventing pests and diseases during repotting, our Indoor Plants – Lushy Gardens and Pest & Disease Management – Lushy Gardens sections have you covered. Don’t wait for your plant’s health to decline. Visit Lushy Gardens now to access expert tips, step-by-step guides, and product recommendations that empower you to give your plants the care they deserve today.
Frequently Asked Questions
How do I choose the right pot for repotting my plant?
Selecting the right pot is essential for healthy growth. Choose a container that is 1 to 2 inches wider in diameter than the current pot and has adequate drainage holes to prevent root rot.
What materials do I need to repot a plant?
You’ll need fresh potting mix, your chosen pot, gardening gloves, and optionally pruning shears. Gather these items before starting to ensure a smooth repotting process.
How can I safely remove my plant from its old pot?
To remove your plant, gently squeeze the sides of the pot to loosen the soil, then tip the pot upside down while supporting the plant with one hand. This method helps avoid damaging the roots.
What should I look for when inspecting the roots during repotting?
Examine the roots for their color and texture; healthy roots are white or light tan and firm. Trim any dark or mushy roots with sterilized scissors to encourage healthy growth.
How do I position my plant correctly in its new pot?
When placing your plant in its new pot, ensure the soil surface around the stem matches the previous soil level. Center the plant and fill soil gently around the root ball to eliminate air pockets.
How do I monitor my plant’s recovery after repotting?
Check for stability and healthy signs such as upright positioning and new growth within 2 to 4 weeks after repotting. Maintain consistent care and avoid making drastic environmental changes during this adjustment period.
Recommended
- Master Plant Propagation Methods for Thriving Gardens – Lushy Gardens
- Mastering Propagating Houseplants: A Complete Guide – Lushy Gardens
- Master Plant Propagation Techniques for Thriving Gardens – Lushy Gardens

I’m Eleanor, a seasoned gardener with over three decades of experience tending to Mother Nature’s creations. Through Lushy Gardens, I aim to share my wealth of knowledge and help fellow plant enthusiasts uncover the wonders of gardening. Let’s dive into this journey together, one leaf at a time.


