
Table of Contents
TL;DR:
- Brown leaf tips on indoor plants are mainly caused by low humidity, fluoride and salt buildup, overwatering, underwatering, or environmental factors like sun scorch and drafts. Proper diagnosis relies on recognizing specific symptom patterns, such as yellow halos or uniform crispy tips, to apply targeted fixes like increasing humidity, using better water, or adjusting watering habits. Correcting root causes and trimming carefully prevents further damage, with patience required for new healthy growth to replace existing brown tips.
Brown leaf tips on indoor plants are defined as localized necrosis at leaf margins, caused by a mismatch between the plant’s needs and its environment. This condition, sometimes called “tip burn” in horticultural literature, affects tropical houseplants most often because their native habitats differ sharply from the average living room. The main culprits are low humidity, fluoride or chlorine in tap water, salt buildup in soil, and poor watering habits. Diagnosing the right cause matters because the wrong fix can make things worse. This guide walks you through each cause, its symptoms, and exactly what to do about it.
1. Low humidity: the leading cause of brown leaf tips indoor plants
Low ambient humidity below 50% is the single most common reason tropical houseplants develop brown tips. Most homes run at 30–40% relative humidity, well below what plants like Calathea, Maidenhair Fern, and Bird of Paradise need. When air moisture drops, leaf tissue loses water faster than roots can replace it. The tips, being the farthest point from the root system, dry out first.
The symptom pattern is distinctive: uniform brown tips with no yellow halo around them. The tissue feels crispy and dry to the touch. Central heating in winter makes this worse. Humidity can drop below 30% during cold months, triggering tip desiccation within days across an entire plant collection.
Effective ways to raise humidity:
- Place a digital hygrometer near your plants to track real-time RH levels.
- Run a cool-mist humidifier within three feet of sensitive plants.
- Group plants together so they share transpired moisture.
- Set pots on a tray filled with pebbles and water, keeping the pot base above the waterline.
Pro Tip: Misting is largely ineffective for preventing brown tips. It raises humidity for only minutes at a time. A humidifier is the only reliable solution for species that need consistent moisture above 50% RH.
2. Fluoride and chlorine toxicity from tap water
Fluoride sensitivity is a real and underappreciated cause of indoor plant leaf problems. Genera like Dracaena, Calathea, and Spider plant suffer tip necrosis when fluoride levels reach as low as 0.5 ppm after 6–8 weeks of regular tap water use. Most municipal water supplies in the United States contain fluoride at 0.7 ppm, which sits right at the damage threshold for sensitive species.
The symptom here differs slightly from humidity damage. You will often see a faint yellow halo between the brown tip and the healthy green tissue. That halo is a chemical damage signal. Chlorine causes similar reactions, though it dissipates if you let tap water sit uncovered overnight.
Better water choices for sensitive plants:
- Distilled water removes fluoride and chlorine entirely.
- Reverse-osmosis filtered water is the next best option.
- Collected rainwater works well and costs nothing.
- Tap water left out for 24 hours reduces chlorine but does not remove fluoride.
Pro Tip: Flushing the soil every 4–6 weeks with distilled or rainwater removes accumulated fluoride before it reaches damaging concentrations. Soil flushing is a maintenance habit, not a one-time rescue.
Misting with tap water does not fix fluoride toxicity. It adds more fluoride directly to leaf surfaces, which can accelerate damage on contact-sensitive species.
3. Salt buildup from fertilizers and hard water
Salt accumulation is one of the sneakiest causes of brown leaf edges because it can build up slowly over months before symptoms appear. When the electrical conductivity (EC) of the root zone rises above 2.0 mS/cm, roots struggle to absorb water even when the soil feels moist. The plant essentially experiences drought stress from the inside out.
Salt buildup shows up visually as a white or yellowish crust on the soil surface or around the pot rim. That crust is a late-stage sign. By the time you see it, root damage is already underway. A yellow band between the brown tip and green tissue also points to salt or chemical damage rather than simple dryness.
How to identify and fix salt buildup:
- Scrape off the white crust from the soil surface.
- Flush the pot with water equal to three times the pot volume, letting it drain completely.
- Repeat this leaching process every 4–6 weeks for plants that receive regular fertilizer or hard water.
- Reduce fertilizer concentration to half the recommended dose during the growing season.
- Replace the top inch of soil annually to remove residual salt deposits.
Pro Tip: Leaching with three times the pot volume of water reduces root-zone EC below the damage threshold in a single session. Do this outdoors or in a sink where drainage is unrestricted.
4. Overwatering and root rot
Overwatering is the most common mistake indoor plant owners make, and it produces brown tips in a counterintuitive way. When roots sit in waterlogged soil, they suffocate and begin to rot. Root damage from overwatering can reduce the functional root mass significantly, cutting off the plant’s ability to move water upward. Leaves develop brown tips despite the soil being wet.
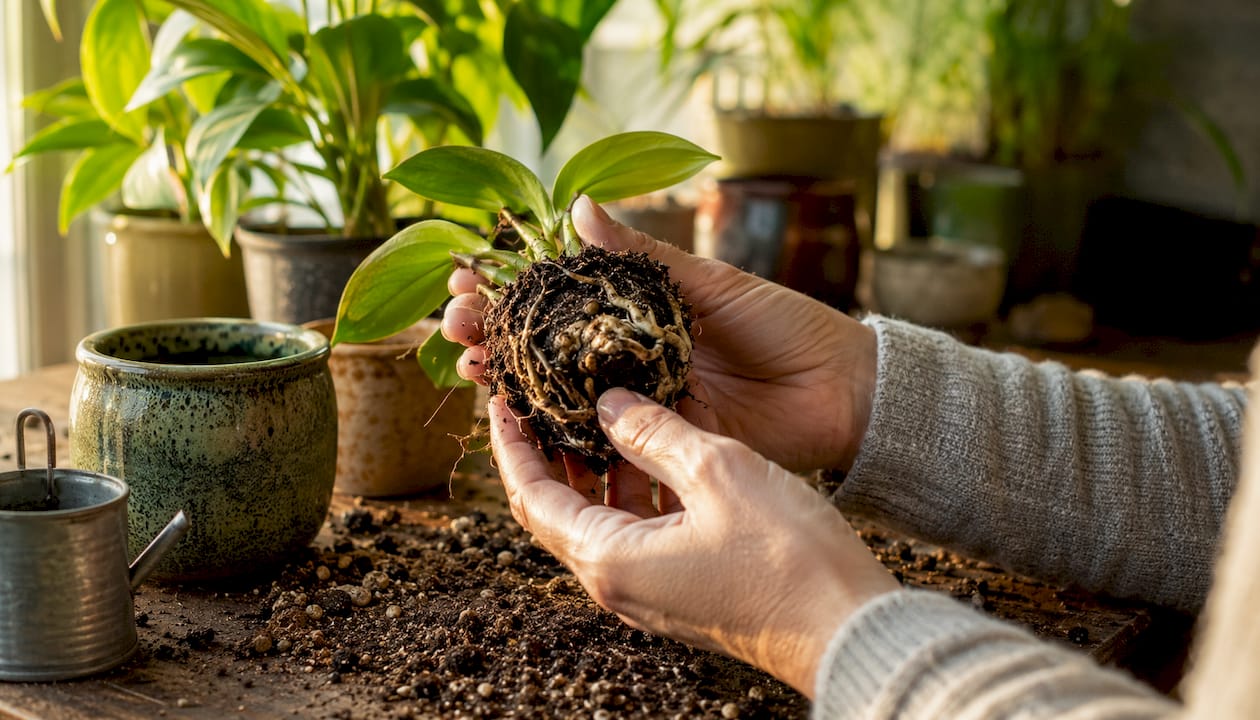
The key diagnostic step is checking the roots directly. Pull the plant from its pot and look. Healthy roots are white or light tan and firm. Rotting roots are brown, mushy, and may smell sour. If you find rot, trim the damaged roots with clean scissors, let them air dry for an hour, and repot into fresh, well-draining mix.
Adjust your watering schedule based on soil moisture, not a fixed calendar. Stick your finger two inches into the soil. Water only when it feels dry at that depth. For most tropical houseplants, this means watering every 7–14 days depending on pot size, light, and season. You can find detailed guidance on watering frequency and technique at Lushygardens.
5. Underwatering and dry root systems
Underwatering produces brown tips that look similar to humidity damage but come with a clear diagnostic clue: bone-dry soil. When a plant goes without water too long, leaf tips are the first tissue to lose turgor and die. The browning spreads inward from the tip and the entire leaf may eventually curl.
Root inspection separates underwatering from overwatering quickly. Underwatered roots are dry, shrunken, and may pull away from the pot walls. The soil often contracts and cracks. Rehydrate slowly by bottom-watering: set the pot in a tray of water for 20–30 minutes so the root ball absorbs moisture evenly without shocking the plant.
Avoid the temptation to drench a severely underwatered plant all at once. Gradual rehydration over two or three sessions prevents osmotic shock, which can cause additional leaf damage on already stressed plants.
6. Sun scorch, cold drafts, and natural aging
Not every case of brown leaf tips signals a care problem. Sun scorch, cold drafts, and normal leaf aging all produce browning that looks similar at first glance.
Sun scorch appears as bleached or brown patches on the parts of the leaf facing the light source, not just at the tips. Moving the plant back from a south-facing window by two to three feet usually stops new damage.
Cold drafts from air conditioning vents, open windows, or exterior doors cause brown tips on the side of the plant facing the airflow. The damage is often asymmetric. Relocating the plant away from drafts resolves the issue within a few weeks.
Natural aging causes lower, older leaves to yellow and brown from the base outward. This is normal and requires no intervention beyond removing the spent leaf cleanly.
General prevention habits:
- Check ambient humidity weekly with a hygrometer.
- Flush soil every 4–6 weeks if you use tap water or fertilizer.
- Rotate plants quarterly so all sides receive even light exposure.
- Trim brown tips with clean, sharp scissors, leaving a thin sliver of brown tissue at the cut edge.
That last point matters more than most plant owners realize. Cutting into healthy green tissue triggers a wounding response that causes fresh browning at the cut site. Leave a small margin of dead tissue and the plant will not respond.
Key Takeaways
Fixing brown leaf tips requires identifying the specific cause first, because humidity damage, fluoride toxicity, salt buildup, and root problems each demand a different response.
| Point | Details |
|---|---|
| Humidity is the top cause | Keep indoor RH above 50% using a humidifier, not misting, for sensitive tropical plants. |
| Water quality matters | Use distilled or rainwater for Dracaena, Calathea, and Spider plant to avoid fluoride damage. |
| Flush soil regularly | Leach pots with three times the pot volume of water every 4–6 weeks to clear salt buildup. |
| Check roots before watering | Brown mushy roots signal overwatering; dry shrunken roots signal underwatering. |
| Trim carefully | Leave a thin sliver of brown tissue when cutting tips to avoid triggering new browning. |

What I have learned from years of watching plants struggle
The most common mistake I see indoor plant owners make is treating brown tips as a watering problem. They water more, the roots rot, and the tips get worse. The second most common mistake is misting. It feels productive, but it does nothing lasting for humidity.
Pattern recognition is the real skill here. A yellow halo between brown and green tissue tells you the cause is chemical or salt-related, not dryness. Uniform crispy tips with no halo point to humidity or underwatering. Asymmetric browning on one side of the plant almost always means a draft or a light source. Once you train yourself to read those patterns, diagnosis takes about 30 seconds.
I also think people underestimate how long recovery takes. New growth will not show damage if you fix the root cause, but existing brown tips will not turn green again. You are waiting for the next flush of leaves, which can take four to eight weeks. Patience is part of the process.
The trimming advice is the one I repeat most often: leave a sliver of dead tissue at the cut edge. It sounds counterintuitive, but cutting into live tissue starts the browning cycle over again. A tiny brown margin is far better than a fresh wound.
Lushygardens resources for healthier indoor plants
Lushygardens covers every aspect of indoor plant care that connects to brown leaf tips, from humidity management and water quality to fertilizer schedules and root health. The indoor plant troubleshooting guide walks through diagnosis step by step, helping you match symptoms to causes without guesswork. For plant owners who are newer to the hobby, the gardening basics guide covers foundational care principles that prevent most leaf tip problems before they start. Both resources are free and built around the same practical, no-filler approach you found here.
FAQ
What causes brown leaf tips on indoor plants?
Brown leaf tips result from low humidity, fluoride or salt in water, overwatering, underwatering, sun scorch, or cold drafts. Identifying the symptom pattern, such as whether a yellow halo is present, points to the specific cause.
Can brown tips turn green again?
Brown leaf tissue is dead and will not recover. New growth will appear healthy once you correct the underlying cause, but existing brown tips stay brown until you trim them.
How do I fix brown tips caused by tap water?
Switch to distilled, reverse-osmosis, or rainwater, and flush the soil with three times the pot volume of water to remove accumulated fluoride and salts. Repeat the flush every 4–6 weeks as ongoing maintenance.
Is misting effective for preventing brown leaf tips?
Misting raises humidity for only a few minutes and is not effective for preventing tip burn. A cool-mist humidifier that maintains ambient RH above 50% is the reliable solution for humidity-sensitive species.
How should I trim brown tips without causing more damage?
Use clean, sharp scissors and cut along the natural leaf shape, leaving a thin sliver of brown tissue at the edge. Cutting into healthy green tissue triggers a wounding response that causes fresh browning at the cut site.
Recommended
- What causes brown leaf tips? Diagnose & fix plant issues – Lushy Gardens
- Why Plant Leaves Turn Yellow—Causes and Solutions – Lushy Gardens
- Solving Indoor Plant Problems: Expert Solutions – Lushy Gardens
- Why Is My Plant Turning Yellow and Brown? – Lushy Gardens

I’m Eleanor, a seasoned gardener with over three decades of experience tending to Mother Nature’s creations. Through Lushy Gardens, I aim to share my wealth of knowledge and help fellow plant enthusiasts uncover the wonders of gardening. Let’s dive into this journey together, one leaf at a time.


