
Table of Contents
TL;DR:
- Yellow tomato leaves can indicate normal aging, nutrient deficiencies, overwatering, or disease.
- Diagnosing the pattern and location of yellowing helps identify the specific cause.
- Proper watering, soil pH, nutrient management, and timely pruning generally promote healthy growth.
Yellow tomato leaves can send even experienced gardeners into a spiral of worry. But here’s the thing: not every yellow leaf means your plant is in serious trouble. Causes range from completely normal aging to fixable care mistakes like overwatering or a simple nutrient gap. Before you reach for a fertilizer or a fungicide, it pays to slow down and look closely. This guide walks you through the most common reasons tomato leaves turn yellow and gives you clear, practical steps to figure out exactly what’s going on and how to fix it.
Key Takeaways
| Point | Details |
|---|---|
| Pattern reveals cause | Observing where and how leaves yellow helps pinpoint whether nutrition, disease, water, or natural cycles are to blame. |
| Most problems are fixable | With simple adjustments like proper fertilization and watering, most yellowing leaf issues can be reversed. |
| Do not panic | Not all yellow leaves indicate trouble—some are just the plant growing or aging naturally. |
| Test before treating | Testing soil and diagnosing carefully prevents making mistakes that could worsen your tomato plants’ health. |
Recognizing patterns in yellowing leaves
Now that you know not every yellow leaf spells disaster, let’s look at how you can spot what’s really going on with your tomato plant. The single most useful skill you can develop is reading the pattern of yellowing, because where the yellowing starts and how it spreads tells you almost everything.
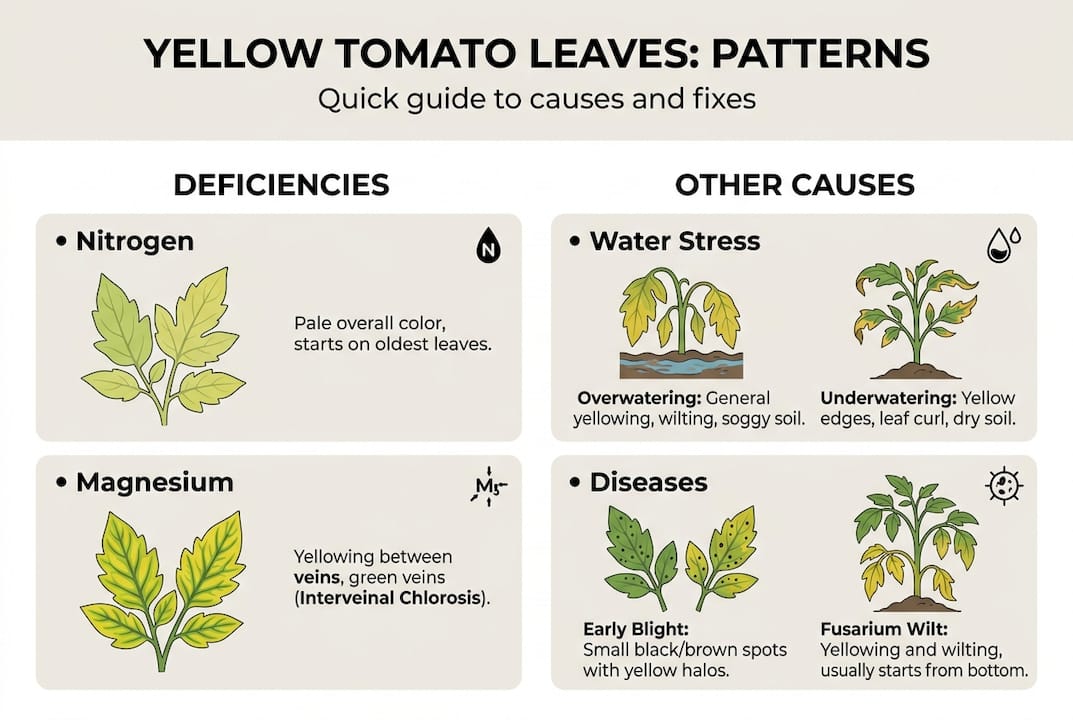
According to the University of Georgia Extension, you can diagnose by pattern: uniform lower leaf yellowing points to nitrogen deficiency, overwatering, or natural aging; interveinal yellowing (where leaf veins stay green but tissue between them turns yellow) suggests magnesium or iron issues; and one-sided wilting with yellowing often means a wilt disease is at work.
Here’s a quick comparison to keep handy:
| Pattern | Location | Likely cause |
|---|---|---|
| Uniform yellowing | Lower, older leaves | Nitrogen deficiency or natural aging |
| Interveinal yellowing | Older leaves | Magnesium deficiency |
| Interveinal yellowing | Younger, upper leaves | Iron deficiency |
| One-sided wilt and yellow | Any level | Fusarium or Verticillium wilt |
| General pale yellowing | Whole plant | Overwatering or poor drainage |
When you go out to examine your plants, check these things systematically:
- Soil moisture: Push a finger 2 inches into the soil. Is it soggy or bone dry?
- Leaf age: Are the yellowing leaves at the bottom (older) or the top (newer growth)?
- Stem and crown: Look for dark streaking or mushy tissue at the base.
- Pests: Flip leaves over and check for tiny bugs, webbing, or sticky residue.
- Overall vigor: Is the rest of the plant growing normally and setting fruit?
The pattern and location of yellowing are your best diagnostic tools. A single yellow leaf at the base of a thriving plant is almost never cause for alarm. A spreading pattern moving upward is worth investigating quickly.
For a deeper look at the full range of causes, the expert tomato yellowing guide at Lushy Gardens covers additional scenarios. You can also cross-reference general leaf yellowing causes to see how tomatoes compare to other plants.
Nutrient deficiencies: Nitrogen, magnesium, and iron
Once you notice a particular yellowing pattern, it’s time to dig into one of the most common culprits: nutritional problems. Tomatoes are heavy feeders, and they’ll show deficiencies faster than most vegetables.
Yellowing of lower or older leaves often signals nitrogen deficiency. Nitrogen drives leafy, green growth, so when it runs low, the plant pulls it from older leaves first, causing them to pale and yellow uniformly. Interveinal yellowing on older leaves points to magnesium deficiency, while the same pattern on younger upper leaves with green veins still intact suggests iron deficiency.
Here’s how the three most common deficiencies stack up:
| Nutrient | Affected leaves | Key symptom | Quick fix |
|---|---|---|---|
| Nitrogen | Lower, older | Uniform pale yellow | Balanced fertilizer or fish emulsion |
| Magnesium | Older, mid-plant | Yellow between veins | Epsom salt foliar spray |
| Iron | Young, upper | Yellow with green veins | Chelated iron, lower soil pH |
Practical steps for each:
- Nitrogen: Apply a balanced tomato fertilizer or a side-dressing of compost. Avoid over-applying, since too much nitrogen pushes leafy growth at the expense of fruit.
- Magnesium: Mix one tablespoon of Epsom salt (magnesium sulfate) in a gallon of water and spray directly on affected leaves. Results often show within a week.
- Iron: Iron deficiency is almost always a soil pH problem rather than a true lack of iron. When pH climbs above 7.0, iron becomes unavailable to roots even if it’s present in the soil.
Soil pH is the hidden lever behind most nutrient deficiencies. Checking the soil pH for vegetables before adding any amendments saves you from making the problem worse.
Pro Tip: Always run a basic soil test before adding fertilizers or minerals. Piling on nutrients without knowing your starting point can create new imbalances that are harder to fix than the original deficiency.
Watering woes and root health
Nutrition is only part of the puzzle; your watering habits play an equally critical role. Overwatering is one of the most common mistakes home gardeners make, and it mimics the look of almost every other problem.
Overwatering causes yellowing, especially in lower leaves, because waterlogged soil cuts off oxygen to the roots. Without oxygen, roots begin to suffocate and eventually rot, which blocks water and nutrient uptake even though the soil is wet. The plant looks thirsty and yellow despite sitting in soggy ground.
Signs you’re overwatering:
- Lower leaves turn yellow and feel soft or limp.
- Soil stays wet for more than 3 days after watering.
- The plant wilts even though the soil is damp.
- You notice a sour or musty smell near the soil surface.
- Roots look brown and mushy if you gently check them.
The fix is straightforward. Water tomatoes 1 to 2 inches per week and let the top 1 to 2 inches of soil dry out between sessions. In containers, make sure drainage holes are clear and never let pots sit in standing water.
Tomatoes prefer deep, infrequent watering over frequent shallow drinks. Deep watering encourages roots to grow downward, making plants more resilient during dry spells.
Pro Tip: Water early in the morning so foliage dries quickly and roots have moisture through the hottest part of the day. Evening watering keeps leaves wet overnight, which invites fungal problems.
If you’re unsure whether your issue is too much or too little water, the overwatering vs underwatering guide breaks down the differences clearly. You can also check the yellowing leaves care mistakes resource for a broader look at common errors.
Diseases and pests: When yellowing signals trouble
Even with correct care, sometimes a deeper issue is to blame. Let’s look at how diseases and pests fit into the picture.
Fusarium and Verticillium wilts cause lower leaf yellowing that is often one-sided, meaning one branch or one side of the plant yellows while the other stays green. If you slice through the main stem near the base, you’ll see brown or tan streaking inside the vascular tissue. That discoloration is the clearest sign of a systemic wilt disease, and unfortunately there’s no cure once it takes hold.
Spider mites cause stippling, tiny pale dots on leaves that merge into yellow blotching. Aphids cluster on new growth and cause curling, sticky residue, and yellowing. Both are manageable if caught early.
Key steps for disease and pest management:
- Remove affected leaves immediately and dispose of them away from the garden, not in the compost.
- Improve airflow by pruning lower leaves and suckers to keep foliage off the soil.
- Rotate crops every year. Never plant tomatoes in the same spot two seasons in a row.
- Use insecticidal soap for spider mites and aphids. Spray the undersides of leaves where pests hide.
- Choose resistant varieties next season. Look for the letters V and F on seed packets, which indicate Verticillium and Fusarium resistance.
When yellowing spreads quickly from the base upward and the plant wilts despite adequate water, suspect a wilt disease rather than a nutrient issue. Acting fast to remove and contain affected plants protects the rest of your garden.
For a full breakdown of both problems and solutions, the disease and pest solutions guide covers what to do at each stage.
Natural leaf aging, soil pH, and special cases
While problems often need tackling, sometimes yellowing is just a natural part of a tomato plant’s cycle or a quick fix away.
Lower leaves yellow and drop as tomato plants mature because the plant redirects energy and nutrients toward fruit and new growth higher up. This is called senescence, and it’s completely normal. If your plant is producing fruit and the upper growth looks healthy and green, a few yellow lower leaves are not a problem.
Soil pH between 6.2 and 6.8 is the sweet spot for tomatoes. Outside that range, nutrients lock up in the soil and become unavailable to roots, which triggers yellowing that looks like a deficiency even when nutrients are present. A simple pH test from a garden center can confirm this in minutes.
Other less obvious causes worth checking:
- Transplant shock: Newly planted tomatoes often show temporary yellowing as roots adjust. Give them a week or two before assuming something is wrong.
- Cold soil: Soil temperatures below 60°F slow nutrient uptake and mimic deficiency symptoms. This is common in early spring plantings.
- Root disturbance: Cultivating too close to the plant can damage shallow roots and cause sudden yellowing.
- Sunscald: Leaves exposed to intense afternoon sun can bleach and yellow, especially on plants that were recently moved outdoors.
Pro Tip: If a few lower leaves are yellowing but your plant is flowering, setting fruit, and the upper leaves look dark green and healthy, don’t panic. That’s a thriving tomato plant doing exactly what it should.
For a full explanation of how pH affects your whole garden, the soil pH explained guide is a great next read.
A gardener’s perspective: What most advice misses about yellowing leaves
Now that we’ve covered the science and solutions, here’s a frank viewpoint from years of hands-on tomato growing.
Most gardeners who come to us frustrated about yellow leaves have already done too much, not too little. They fertilized, then watered more, then sprayed something, all within the same week. The plant never had a chance to respond to any single change before the next one landed.
The advice you’ll find almost everywhere focuses on identifying a cause and applying a fix. What it rarely says is this: watch your plant for three to five days before doing anything. Yellowing that stops spreading is almost always benign. Yellowing that moves upward quickly or causes wilting is the kind that needs action.
Over-correcting is genuinely one of the most common ways gardeners make things worse. Adding magnesium when the real issue is overwatering, for example, doesn’t help and can push other nutrients out of balance. The gardeners who grow the best tomatoes we’ve seen tend to be the ones who observe first and act second. Slow, deliberate diagnostics beat reactive treatments almost every time. You can explore misdiagnosed yellowing causes to see how often the first guess turns out to be wrong.
Get more from your garden with Lushy Gardens
If you’d like to dig deeper or need companion resources for your tomato and garden care, Lushy Gardens has you covered. Whether you’re just getting started or you’ve been growing vegetables for years, the right information at the right time makes all the difference.
At Lushy Gardens, you’ll find everything from a gardening basics guide for those building their first vegetable bed to a detailed seasonal garden maintenance plan that keeps your plants healthy from spring through fall. Every guide is written with real gardeners in mind, focused on practical steps you can actually use rather than overwhelming theory. Bookmark the site and come back whenever your plants throw you a curveball.
Frequently asked questions
Can tomato plants recover from yellow leaves?
Yes, tomato plants often recover well once you identify and address the root cause. Adjusting watering, correcting nutrients, or managing pests usually brings new healthy growth within a couple of weeks.
How can I tell if yellow leaves are from disease or a nutrient problem?
Disease typically causes uneven, one-sided yellowing paired with wilting, while nutrient problems produce uniform yellowing or distinct interveinal patterns. Diagnosing by pattern is the fastest way to tell them apart.
Should I remove yellow leaves from my tomato plants?
Yes, pruning yellow or damaged leaves improves airflow and lowers disease risk. Focus on lower leaves that are touching the soil or heavily affected first.
Is yellowing always a sign of a problem in tomato plants?
No. Lower leaves yellowing as the plant matures and focuses energy on fruit is a completely normal part of the tomato growth cycle and not a cause for concern.
Recommended
- Why is my tomato plant turning yellow? Expert guide 2026 – Lushy Gardens
- Why Plant Leaves Turn Yellow—Causes and Solutions – Lushy Gardens
- Problems With Yellowing Leaves – Causes and Solutions – Lushy Gardens
- Why Are My Plants Leaves Turning Yellow? Solutions That Work – Lushy Gardens

I’m Eleanor, a seasoned gardener with over three decades of experience tending to Mother Nature’s creations. Through Lushy Gardens, I aim to share my wealth of knowledge and help fellow plant enthusiasts uncover the wonders of gardening. Let’s dive into this journey together, one leaf at a time.


